
A/B Testing in Flutter using Unleash and Mixpanel

note

This article is a contribution by Ayush Bherwani as a part of the Community Content Program. You can also suggest a topic by opening an issue, or Write for Unleash as a part of the Community Content Program.

After successfully integrating the first feature flag in the Unsplash sample app, let’s talk about how you can use Unleash to perform experimentation, also known as A/B testing, in Flutter to ship features more confidently.

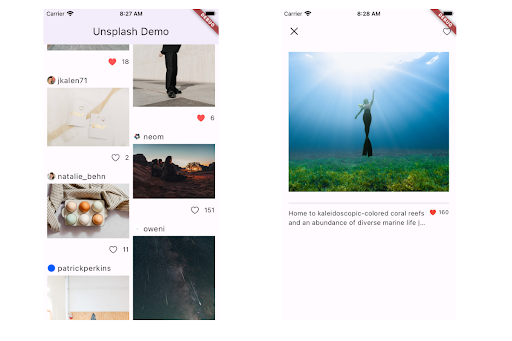
For this article, we’ll integrate feature flags for A/B testing to experiment with “like image” feature user experience. As an overview, the app is quite simple, with two screens displaying images and image details respectively. The behavior of the “image details” feature is controlled through an Unleash instance. You can check out the previous article, “How to set up feature flags in Flutter” for an overview of the code structure and implementation. For those who want to skip straight to the code, you can find it on GitHub.

Here’s a screenshot of the application: Unsplash App built on Flutter

Setup variants in Unleash

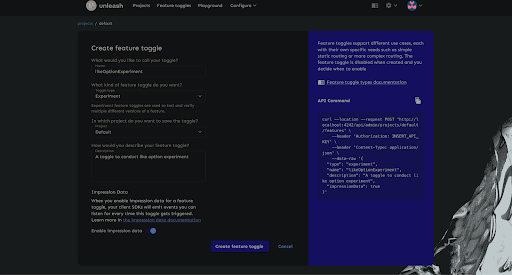
In your Unleash instance, create a new feature flag called likeOptionExperiment. Choose the toggle type called Experiment and enable the impression data. By default, the flag will be set to false.

Set Up Variant in Unleash

Now that you have created your feature toggle, let’s create two new variants “gridTile'' and “imageDetails” respectively. These variants will help you position your “like image” button.

Succesfully setting up variant in Unleash

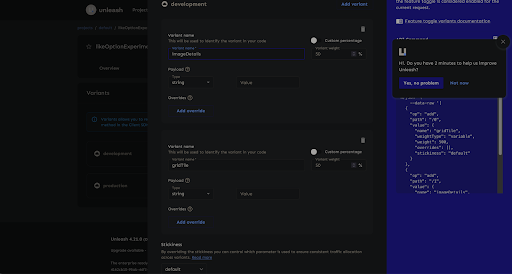
Below is a screenshot of experimentation in action based on the likeOptionExperiment flag and corresponding variants.

Unsplash App built on Flutter

Setup Mixpanel

For analytics and metrics, we’ll use Mixpanel to track user behavior and usage patterns. We have chosen Mixpanel because it offers a user-friendly setup and in-depth user analytics and segmentation. Given that the project follows clean architecture and Test-Driven Development (TDD) principles, you’ll want to create an abstract layer to interact with the Mixpanel.

Whenever a user opens the app, we track like-variant if likeOptionExperiment is enabled to tag them with their assigned variant (gridTile or imageDetails). The stored variant in Mixpanel can be used later to analyze how each variant impacts user behavior to like an image.

Whenever a user interacts with the LikeButton, we track trackLikeEventForExperimentation, along with their assigned variants. By correlating the trackLikeEventForExperimentation with the like-variant, you can effectively measure the impact of a variant on user behavior and make data-driven decisions. To learn how to correlate and generate reports, see the Mixpanel docs.

abstract class MixpanelConfig {
/// ...

/// Helps you get the metrics of experimentation to analysis
/// the different position of the share image button.
void trackLikeEventForExperimentation({
required LikeButtonPosition likeButtonPosition,
required String photoId,
});

/// Help you get the variant based on which we can create funnel
/// for analytics.
void trackLikeVariant(LikeButtonPosition likeButtonPosition);
}

class MixpanelConfigImpl implements MixpanelConfig {
final TargetPlatformExtended targetPlatformExtended;

MixpanelConfigImpl(this.targetPlatformExtended);

Mixpanel get mixpanel {
return ServiceLocator.getIt<Mixpanel>();
}

/// ...


void trackLikeEventForExperimentation({
required LikeButtonPosition likeButtonPosition,
required String photoId,
}) {
if (targetPlatformExtended.isMobile) {
mixpanel.track('like-experimentation', properties: {
"variant": describeEnum(likeButtonPosition),
"photoId": photoId,
});
}
}


void trackLikeVariant(LikeButtonPosition likeButtonPosition) {
if (targetPlatformExtended.isMobile) {
mixpanel.track('like-variant', properties: {
"variant": describeEnum(likeButtonPosition),
});
}
}
}

Once you have your configuration in place, the next step is to create MixPanel and MixpanelConfig and add it to your service locator class. Make sure that you have a Mixpanel API key.

class ServiceLocator {
ServiceLocator._();

static GetIt get getIt => GetIt.instance;

static Future<void> initialize() async {
/// ...

final unleash = UnleashClient(
url: Uri.parse('http://127.0.0.1:4242/api/frontend'),
clientKey: dotenv.env["UNLEASH_API_KEY"] as String,
appName: 'unplash_demo',
);

await unleash.start();

getIt.registerLazySingleton(() => unleash);
getIt.registerLazySingleton<UnleashConfig>(
() => UnleashConfigImpl(getIt()),
);

getIt.registerLazySingleton<WebPlatformResolver>(
() => WebPlatformResolverImpl(),
);


final TargetPlatformExtended targetPlatformExtended =
TargetPlatformExtendedImpl(getIt());

getIt.registerLazySingleton<TargetPlatformExtended>(
() => targetPlatformExtended,
);

if (targetPlatformExtended.isMobile) {
final mixPanel = await Mixpanel.init(
dotenv.env["MIXPANEL_KEY"] as String,
trackAutomaticEvents: false,
);

getIt.registerLazySingleton(() => mixPanel);
}

getIt.registerLazySingleton<MixpanelConfig>(
() => MixpanelConfigImpl(getIt()),
);

/// ...
}
}

Integration in Flutter

Let’s dive into how you can use these variants in your Flutter application.

You’ll have to modify UnleashConfig which helps you test the Unleash functionalities in isolation from the rest of the app.

const String isImageDetailsEnabledToggleKey = "isImageDetailsEnabled";
const String likeOptionExperimentKey = "likeOptionExperiment";

/// Helps determine the position of like button
/// [gridTile] will be used to position like image button
/// on [ImageTile].
/// [imageDetails] will be used to position like image button
/// inside the [ImageDetails] page.
enum LikeButtonPosition { gridTile, imageDetails }

abstract class UnleashConfig {
/// ...
bool get isLikeOptionExperimentEnabled;
LikeButtonPosition get likeButtonPosition;
}

class UnleashConfigImpl extends UnleashConfig {
final UnleashClient unleash;

UnleashConfigImpl(this.unleash);

/// ...


bool get isLikeOptionExperimentEnabled =>
unleash.isEnabled(likeOptionExperimentKey);


LikeButtonPosition get likeButtonPosition {
final variant = unleash.getVariant(likeOptionExperimentKey);
return LikeButtonPosition.values.byName(variant.name);
}
}

After updating UnleashConfig you may want to create a _trackLikeExperimentationVariant method which you can call in initState of “HomePage” to get the variant details.

void _trackLikeExperimentationVariant() {
final unleashConfig = ServiceLocator.getIt<UnleashConfig>();
final mixpanelConfig = ServiceLocator.getIt<MixpanelConfig>();
if (unleashConfig.isLikeOptionExperimentEnabled) {
mixpanelConfig.trackLikeVariant(unleashConfig.likeButtonPosition);
}
}

You’ll create a new widget “LikeButton'' which can be utilized for both variants. Make sure to use MixpanelConfig to track user engagement for analytics purposes.

class LikeButton extends StatelessWidget {
final ValueNotifier<bool> isLikedNotifier;
/// Used to track the variant option for the mixpanel event.
final LikeButtonPosition likeButtonPosition;
final String photoId;

const LikeButton({
super.key,
required this.isLikedNotifier,
required this.likeButtonPosition,
required this.photoId,
});


/// Event fired to track the user engagement on liking an image
void _fireMixpanelEvent() {
final mixpanelConfig = ServiceLocator.getIt<MixpanelConfig>();
mixpanelConfig.trackLikeEventForExperimentation(
likeButtonPosition: likeButtonPosition,
photoId: photoId,
);
}


Widget build(BuildContext context) {
return ValueListenableBuilder<bool>(
valueListenable: isLikedNotifier,
builder: (context, isLiked, child) {
return IconButton(
padding: EdgeInsets.zero,
visualDensity: VisualDensity.compact,
iconSize: 20,
isSelected: isLiked,
splashColor: Colors.red,
onPressed: () {
isLikedNotifier.value = !isLikedNotifier.value;
_fireMixpanelEvent();
},
selectedIcon: const Icon(
CupertinoIcons.heart_fill,
color: Colors.redAccent,
),
icon: const Icon(CupertinoIcons.heart),
);
},
);
}
}

Once you have created LikeButton, the next step is to use the LikeButtonPosition to add the button in the ImageTile widget, and ImageDetails page.

For ImageTile make sure the button is only visible if isLikeOptionExperiment is enabled and LikeButtonPosition is gridTile.

class ImageTile extends StatelessWidget {
final UnsplashImage image;
final UnleashConfig unleashConfig;

const ImageTile({
super.key,
required this.image,
required this.unleashConfig,
});

bool get isFooterEnabled {
return unleashConfig.isLikeOptionExperimentEnabled &&
unleashConfig.likeButtonPosition == LikeButtonPosition.gridTile;
}

Widget tileGap() => const SizedBox(height: 4);


Widget build(BuildContext context) {
return CachedNetworkImage(
imageUrl: image.url,
cacheManager: ServiceLocator.getIt<DefaultCacheManager>(),
imageBuilder: (context, provider) {
return Column(
children: [
/// Some more widgets
if (isFooterEnabled) ...[
ImageTileFooter(image: image),
],
],
);
},
);
}
}

For ImageDetailsPage make sure the button is only visible if isLikeOptionExperiment is enabled and LikeButtonPosition is imageDetails.

()
class ImageDetailsPage extends StatefulWidget {
final String id;

const ImageDetailsPage({
super.key,
required this.id,
});


State<ImageDetailsPage> createState() => _ImageDetailsPageState();
}

class _ImageDetailsPageState extends State<ImageDetailsPage> {
/// ...
late final MixpanelConfig mixPanelConfig;
late final ValueNotifier<bool> isLikedNotifier;
late final UnleashConfig unleashConfig;


void initState() {
super.initState();
/// ...
mixPanelConfig = ServiceLocator.getIt<MixpanelConfig>();
isLikedNotifier = ValueNotifier<bool>(false);
unleashConfig = ServiceLocator.getIt<UnleashConfig>();
/// ...
_fetchImageDetails();
}

/// ...

void _fetchImageDetails() {
bloc.add(FetchImageDetailsEvent(widget.id));
}

bool get isLikeButtonVisible {
return unleashConfig.isLikeOptionExperimentEnabled &&
unleashConfig.likeButtonPosition == LikeButtonPosition.imageDetails;
}


Widget build(BuildContext context) {
return Scaffold(
appBar: AppBar(
leading: IconButton(
onPressed: () {
Navigator.of(context).pop();
},
icon: const Icon(
CupertinoIcons.xmark,
),
),
actions: [
if (isLikeButtonVisible) ...[
LikeButton(
isLikedNotifier: isLikedNotifier,
photoId: widget.id,
likeButtonPosition: LikeButtonPosition.imageDetails,
),
]
],
),
body: /// Body widget;
}
}

Now that you have your pieces clubbed, you can toggle the likeOptionExperiment flag to enable the experimentation of the “like image” feature in the application.

Voila! Your experimentation is enabled for your feature. You’ve also ensured that users can access the “like image” feature depending on the state of the flag and variant.

Analytics

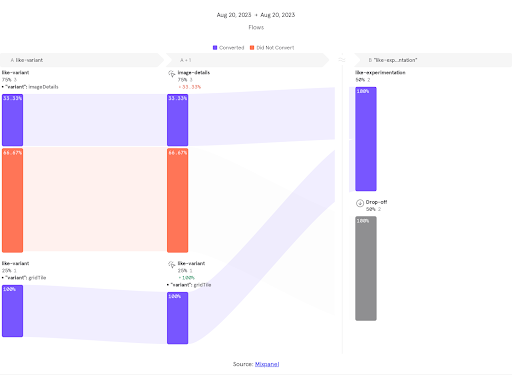
Once your experimentation is up and running, you can visit the Mixpanel dashboard to create a funnel and get insights on the user engagement and conversion rate for different variants.

Below is a funnel screenshot for “like image” experimentation:

Mixpanel Analytics for A/B Testing in Unleash for the Flutter Demo

Conclusion

A/B testing is a low-risk, high-returns approach that can help you make data-driven decisions for your feature releases to increase user engagement, minimize the risk, and increase conversion rates. As a developer, it helps you be confident in your releases by addressing the issues users face and reducing the bounce rates during experimentation with the help of data.

Some of the best practices for experimentation include:

  • You should be open to the results and avoid any hypotheses.
  • You should define the metrics for the success of the experimentation before you run the tests. Keep your success metrics simple and narrowed for better results.
  • Select a group of adequate size for the test to yield definitive results.
  • You should avoid running multiple tests simultaneously, as it may not give reasonable outcomes.

That’s it for today. I hope you found this helpful. Want to dive deep into the code used for this article? It’s all on GitHub.