Activation strategies
Overview
An activation strategy determines who should get a feature. They allow you to enable and disable features for certain users without having to redeploy your application. For example, you can release features only to users with a specific user ID, email, IP address, and more. You can implement gradual rollouts to specific user segments, for example, those on a specific subscription plan or region. You can also use them to schedule feature releases or make features available for a limited time.
An activation strategy is assigned to one feature flag in one environment. A feature flag is enabled in a given context (for example, user or application) if at least one of its activation strategies resolves to true.
When adding a strategy to a flag, you can choose from several strategy types, such as a gradual rollout. Depending on the strategy type, you can further refine the configuration using rollout percentage, targeting, and variants.
Feature flags can have multiple activation strategies. Unleash evaluates each strategy independently, enabling the flag if any resolves to true. This behavior is equivalent to the OR logical operator.
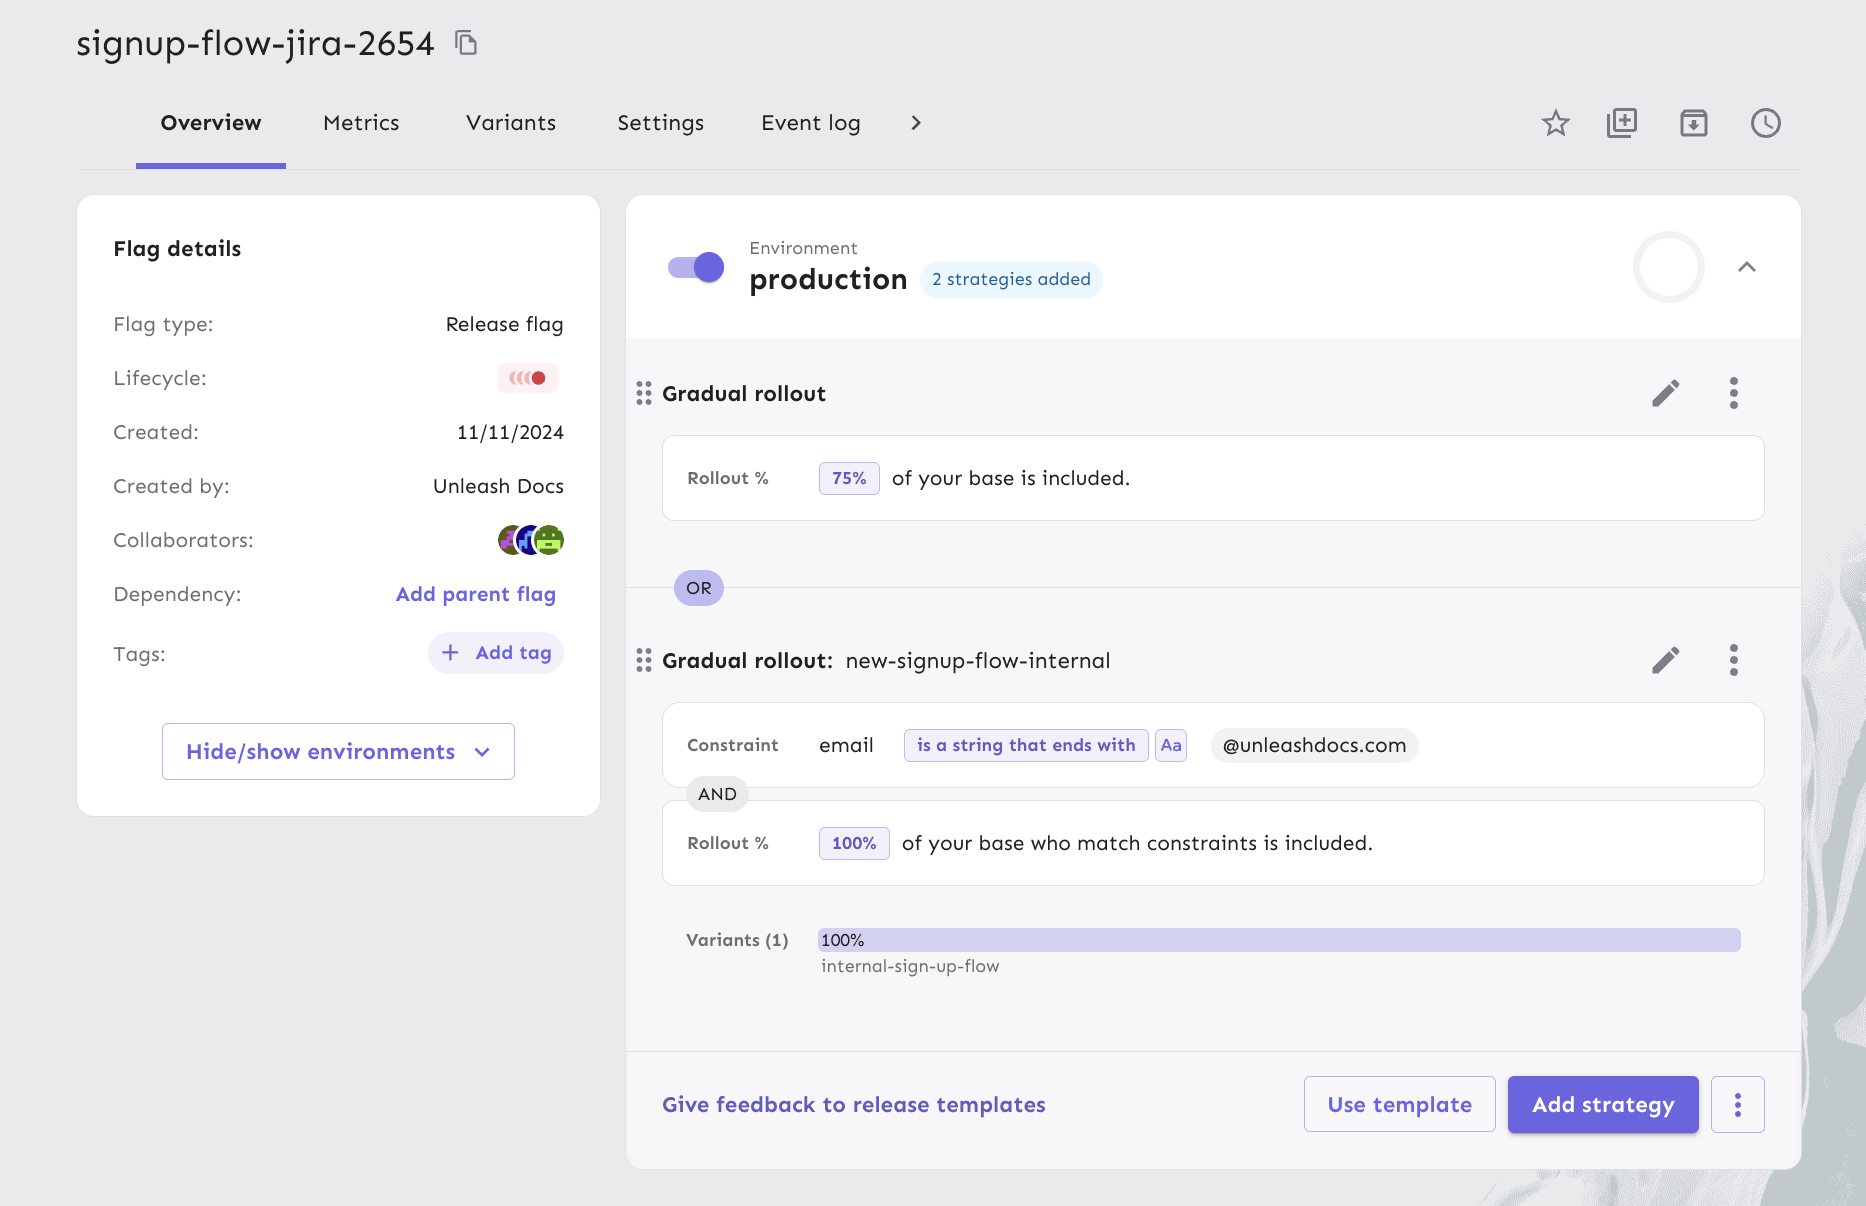
For example, to roll out a feature to 75% of users while granting access to internal users, you can add two activation strategies as follows:
- Gradual rollout to 100% with a constraint on the email address.
- Gradual rollout to 75% (of all users).
Rollout percentage
The rollout percentage determines the proportion of users exposed to a feature. It uses a normalized MurmurHash of a user’s unique ID, ensuring consistent and random feature distribution. Stickiness maintains a stable user experience across sessions.
Targeting
Segmentation and constraints allow you to define conditions for your activation strategies so that they will only be evaluated for users and applications that match those criteria. Constraints are individual conditional statements, while segments are a reusable set of constraints that you can apply to multiple strategies.
Constraints
Version: 4.16+
Constraints are conditional rules that determine whether a strategy applies, based on fields from the Unleash context. Constraints can reference both standard context fields and custom context fields.
An activation strategy can have as many constraints as needed. When an activation strategy has multiple constraints, then every constraint must be evaluated to true for the strategy to be evaluated. This behavior is equivalent to the AND logical operator.
You can use Playground to experiment with different strategy and constraint configurations and how they would evaluate in a given context.
For example, if you have two constraints: one where the user email must have the domain "@mycompany.com" and one where the user must have signed up for a beta program, then the strategy would only be evaluated for users with "@mycompany.com" emails that have signed up for the beta program.
Constraint structure
A constraint has three parts:
- A context field: The context field to use for evaluation.
- An operator: One of the constraint operators.
- Values: A value or list of values to use in the evaluation of the constraint.
These parts turn the constraint into an expression that evaluates to true or false. Here are a few example constraints:
| Context field | Operator | Values | Description |
|---|---|---|---|
userId | STR_ENDS_WITH | @example.com, @mycompany.com | Evaluates to true for users whose user IDs end with @example.com or @mycompany.com. |
currentTime | DATE_AFTER | 2022-06-05 21:43:22Z | Evaluates to true if the current time is after 2022-06-05 21:43:22Z. |
plan | IN | Premium, Plus | Evaluates to true if the custom context field plan is either 'Premium' or 'Plus'. |
Constraint operators
Constraint operators help you define the conditional statements that get evaluated as part of the constraint. Basic operators are available in all versions and SDKs. All other operators require Unleash version 4.9+ and SDK compatibility.
All constraints can be negated. For example:
| Operator | Value | Context field | Result |
|---|---|---|---|
STR_ENDS_WITH | "@user.com" | "hello@user.com" | true |
NOT STR_ENDS_WITH | "@user.com" | "hello@user.com" | false |
Basic operators
| Operator | Description |
|---|---|
IN | The context field is equal to any of the provided values; case sensitive. |
NOT_IN | The context field is not equal to any of the values provided; case sensitive. |
Advanced operators
Numeric operators
Numeric operators compare the numeric value of context fields with the provided value. Numeric operators only accept single values.
| Operator | The context field is |
|---|---|
NUM_EQ | The context field is equal to the provided value. |
NUM_GT | The context field is strictly greater than the provided value. |
NUM_GTE | The context field is greater than or equal to the provided value. |
NUM_LT | The context field is strictly less than the provided value. |
NUM_LTE | The context field is less than or equal to the provided value. |
Date and time operators
All date and time operators require the currentTime context field, and the currentTime context field can only be used with date and time operators. With these operators, you can enable a feature before or after a specified time or make it available for a specific time span by combining the two operators.
Date and time operators only support single values.
| Operator | Description |
|---|---|
DATE_AFTER | currentTime is a date after the provided value. |
DATE_BEFORE | currentTime is a date before the provided date. |
String operators
String operators accept multiple values and can be set to be case-sensitive or case-insensitive.
| Operator | Description |
|---|---|
STR_CONTAINS | The context field contains any of the provided string values. |
STR_ENDS_WITH | The context field ends with any of the provided string values. |
STR_STARTS_WITH | The context field starts with any of the provided string values. |
Versioning (SemVer) operators
SemVer operators are used to compare version numbers such as application versions or dependency versions. SemVer operators only support single values.
The value must start with and contain at least major, minor, and patch versions. For example, 1.2.3. Optionally, you can also define pre-release version information by adding a hyphen and series of full-stop separated identifiers after the patch version. For example, 1.2.3-rc.2. Values with pre-release versions are considered less than versions without a pre-release in accordance with the SemVer specification, item 11.
| Operator | Description |
|---|---|
SEMVER_EQ | The context field is equal to the provided value. |
SEMVER_GT | The context field is strictly greater than the provided value. |
SEMVER_LT | The context field is strictly less than the provided value. |
Best practices
Backend SDKs fetch the full feature flag configuration associated with your API key from Unleash. You can use API keys scoped to specific projects or environments to optimize payload size.
However, every value that you add to your feature flag constraints, increases the payload size. We recommend avoiding large constraint value lists. For example, instead of adding many user IDs or emails to the constraint value list, consider what properties those users share. This typically helps define and use a custom context field instead.
Add an activation strategy
To add an activation strategy with a constraint to a feature flag, do the following:
- Open the Admin UI and go to the feature flag you'd like to add a strategy to.
- Select the environment you want to configure and click Add strategy.
- Select your desired strategy type and click Apply or Configure.
- In the Targeting tab, go to the Constraints section, and click Add constraint.
- Select a context field to constrain on, for example,
email. - Set your desired operator, for example,
STR_ENDS_WITH. - Enter a value that the operator should evaluate, such as
@user.com, and click Add values. Then click Done. - Click Save strategy.
Client-side implementation
Activation strategies are defined on the server but implemented client-side. The client determines whether a feature should be enabled based on the activation strategies.
All backend SDKs and Unleash Edge implement the default activation strategy. The frontend SDKs do not perform evaluations themselves. Instead, they rely on Unleash Edge to handle the implementation and evaluation.
When using strategies with constraints, the client must provide the current Unleash context to the flag evaluation function for the evaluation to be done correctly. All official Unleash client SDKs support the option to pass dynamic context values to the isEnabled() function (or the SDK's equivalent).
If the constraint uses a standard Unleash context field, set the context field to the required value. If the constraint uses a custom context field, use the Unleash context's properties field. Use the name of the custom context field as a key and set the value to your desired string.
Unleash SDKs expect all context values to be strings. If you use an operator that acts on non-string values, such as numeric operators or date and time operators, the SDKs attempt to convert the string into the expected type. If the conversion fails, the constraint evaluates to false.
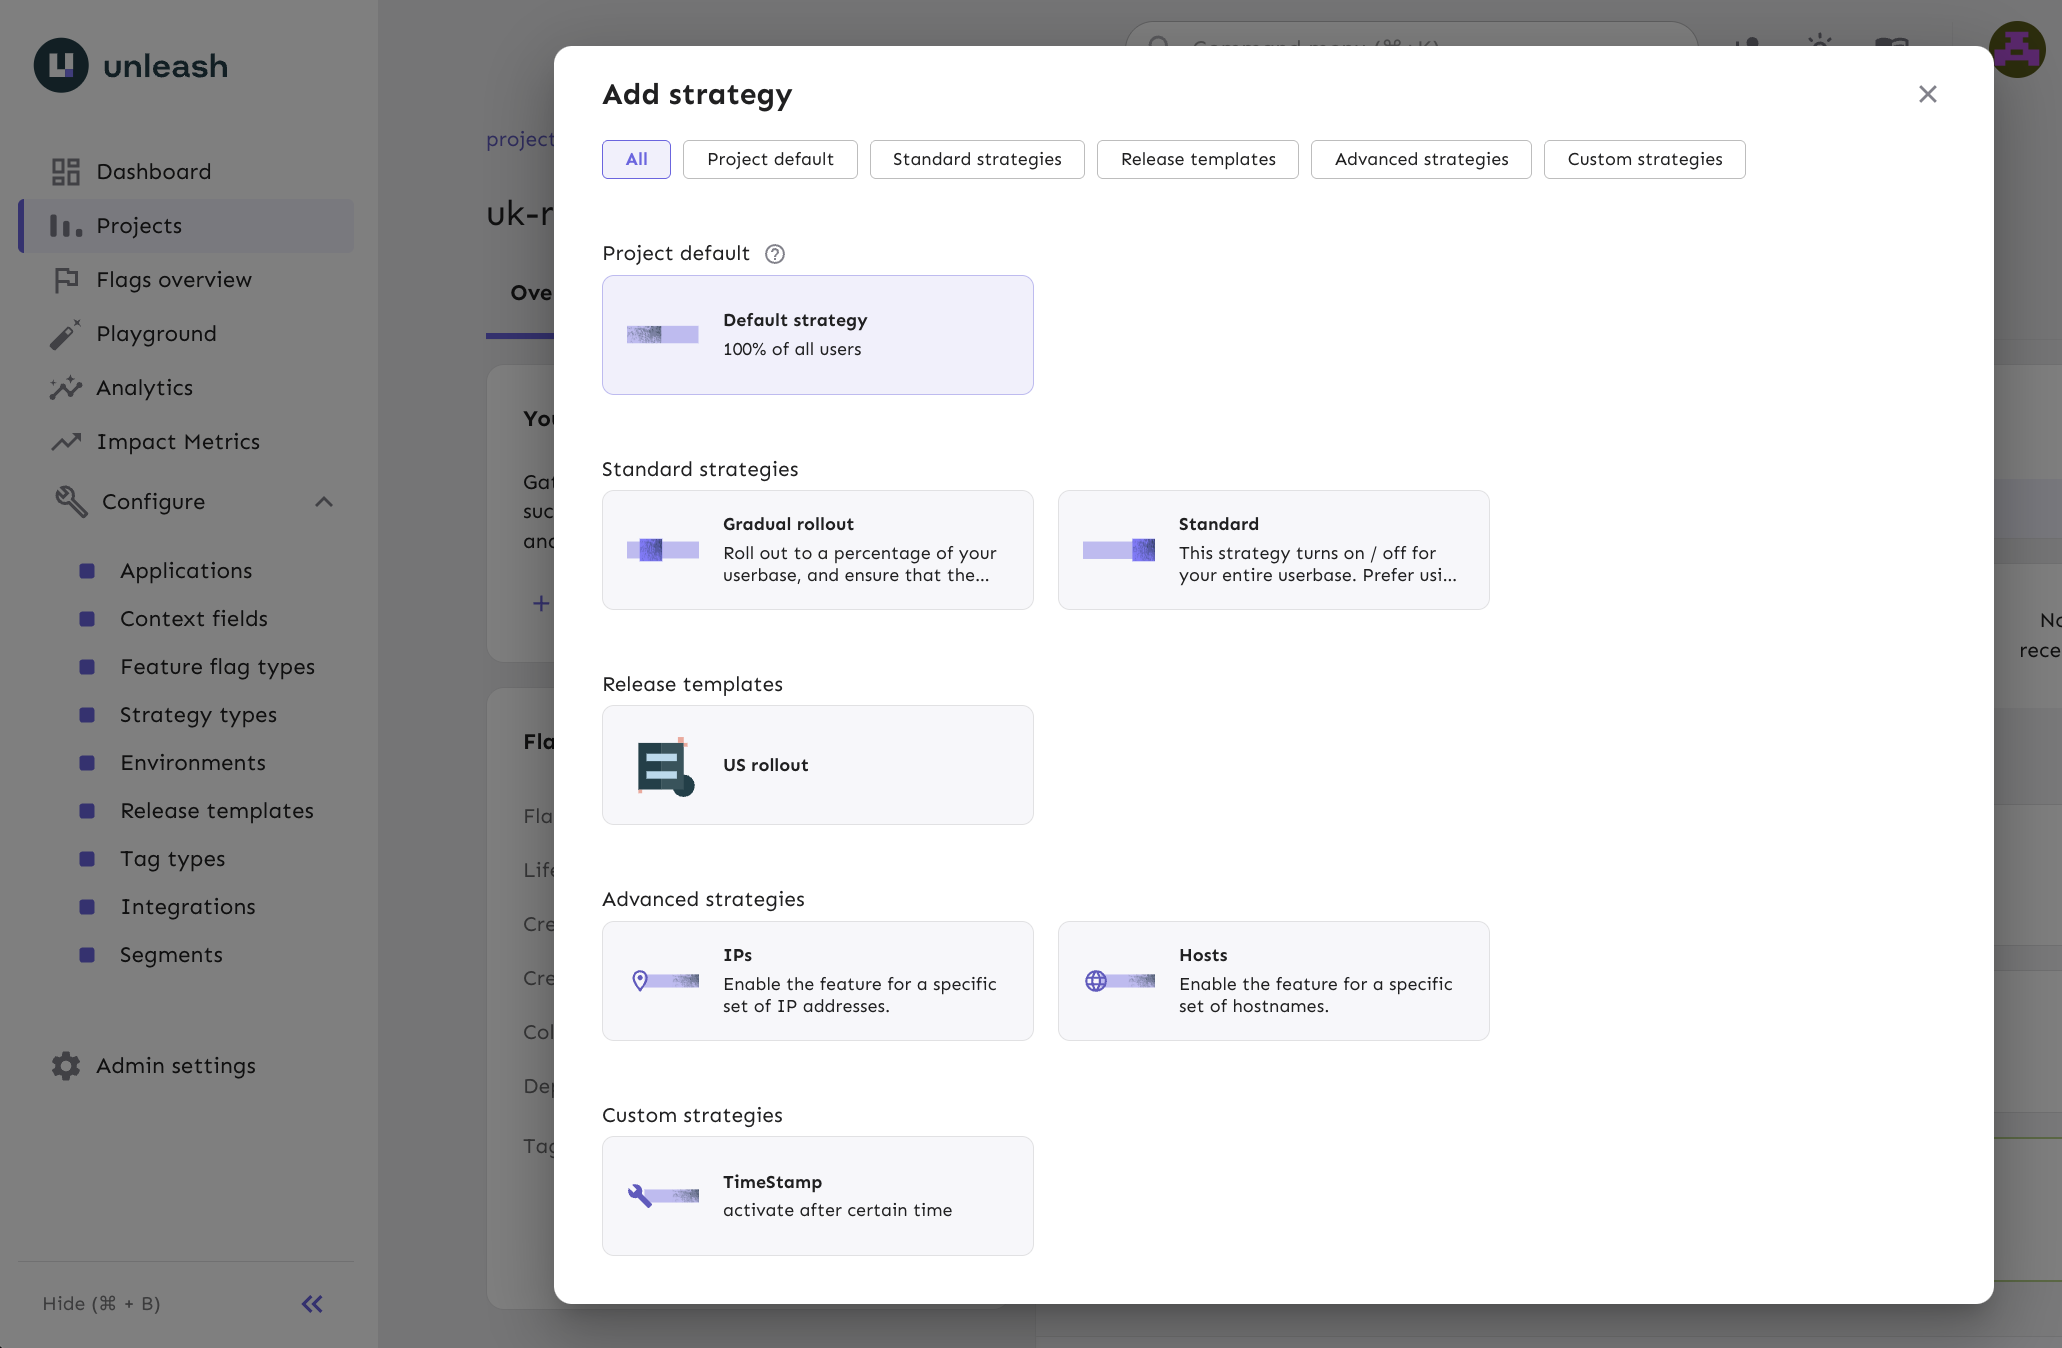
Strategy types
When you add an activation strategy to a flag, you can choose from several options, depending on how you want to target and roll out your feature.
Default strategy
The default activation strategy is a type of gradual rollout strategy that you can configure per project and environment. It defines your most common configuration and is available as a quick option when adding strategies to flags.
Configure the default strategy
- Go to the project where you want to configure the default strategy.
- Open Settings and select Default strategy.
- Choose the environment you want to edit.
- Click Edit default strategy for
<environment name>. - Configure your rollout, targeting, and variants, then click Save strategy.
Add the default strategy to a flag
To add your project’s default strategy, click Add strategy and select Project default.
In environments without an active strategy, you’ll also see a suggested option to apply your default strategy directly.
Standard strategies
Gradual rollout
Roll out a feature to a percentage of your users while ensuring each user has a consistent experience. You can combine gradual rollout with targeting rules to support most rollout scenarios.
Standard on/off
Turn the feature on or off for your entire user base. For more control, we recommend using a gradual rollout strategy set to 100% instead.
Release templates
Release templates are a collection of activation strategies that let you reuse predefined rollout configurations across multiple flags. They make it easier to standardize rollout processes and reduce manual setup.
Advanced strategies
IPs
The remoteAddress strategy activates a feature flag for specific IP addresses.
Parameters:
IPs– List of IPs to enable the feature for.
Hosts
The applicationHostname strategy activates a feature flag for specific hostnames.
Parameters:
hostNames– List of hostnames to enable the feature for.
Custom strategies
Whenever possible, we recommend using a standard gradual rollout strategy with strategy constraints instead of defining a custom strategy. They offer similar flexibility without requiring custom code distribution within your SDKs.
Custom activation strategies let you define your own activation strategies to use with Unleash.
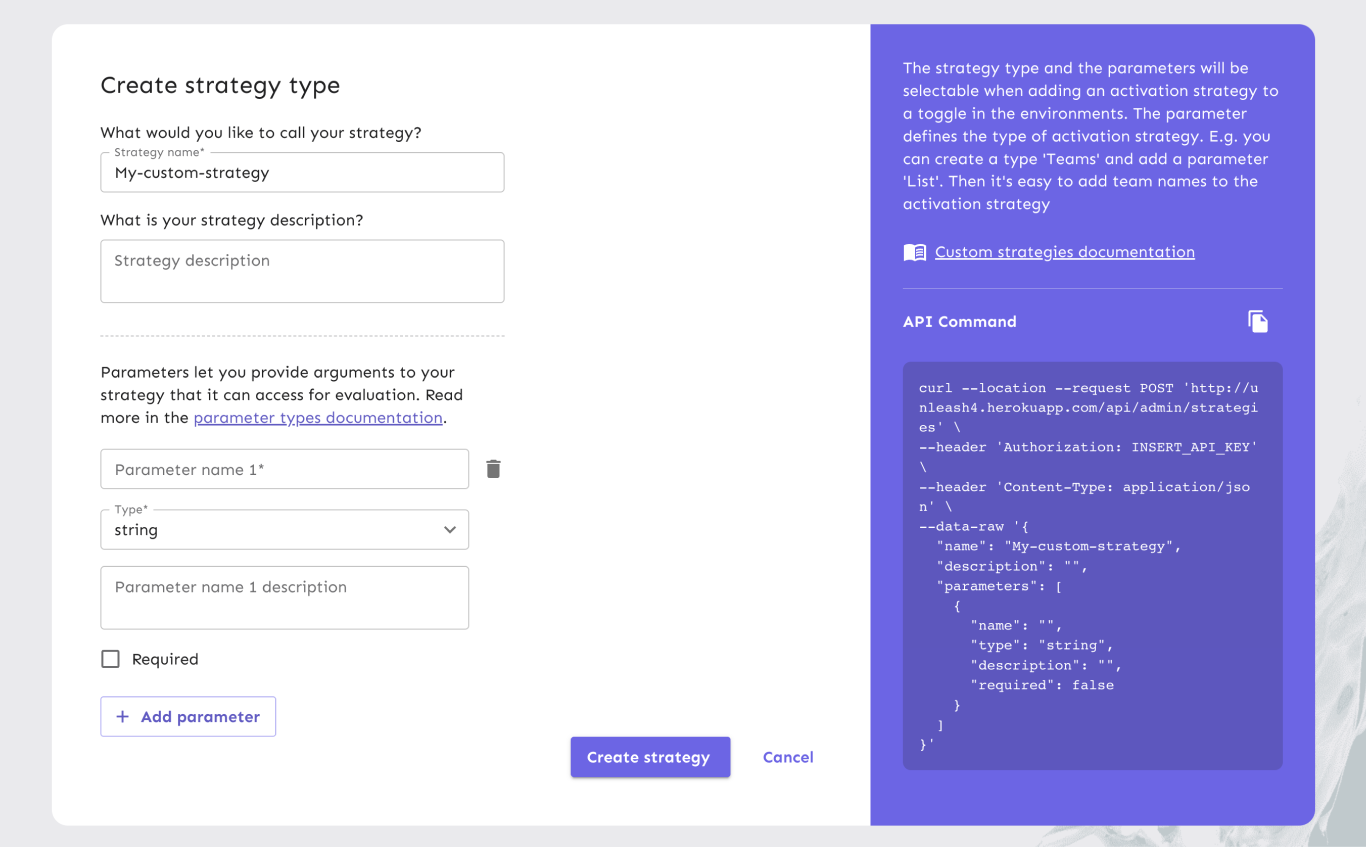
When creating a custom strategy, you must set a name, optionally add a description, and define one or more parameters. The parameters are passed as arguments to your activation strategy and are available to your custom implementation in the SDK.
Parameters
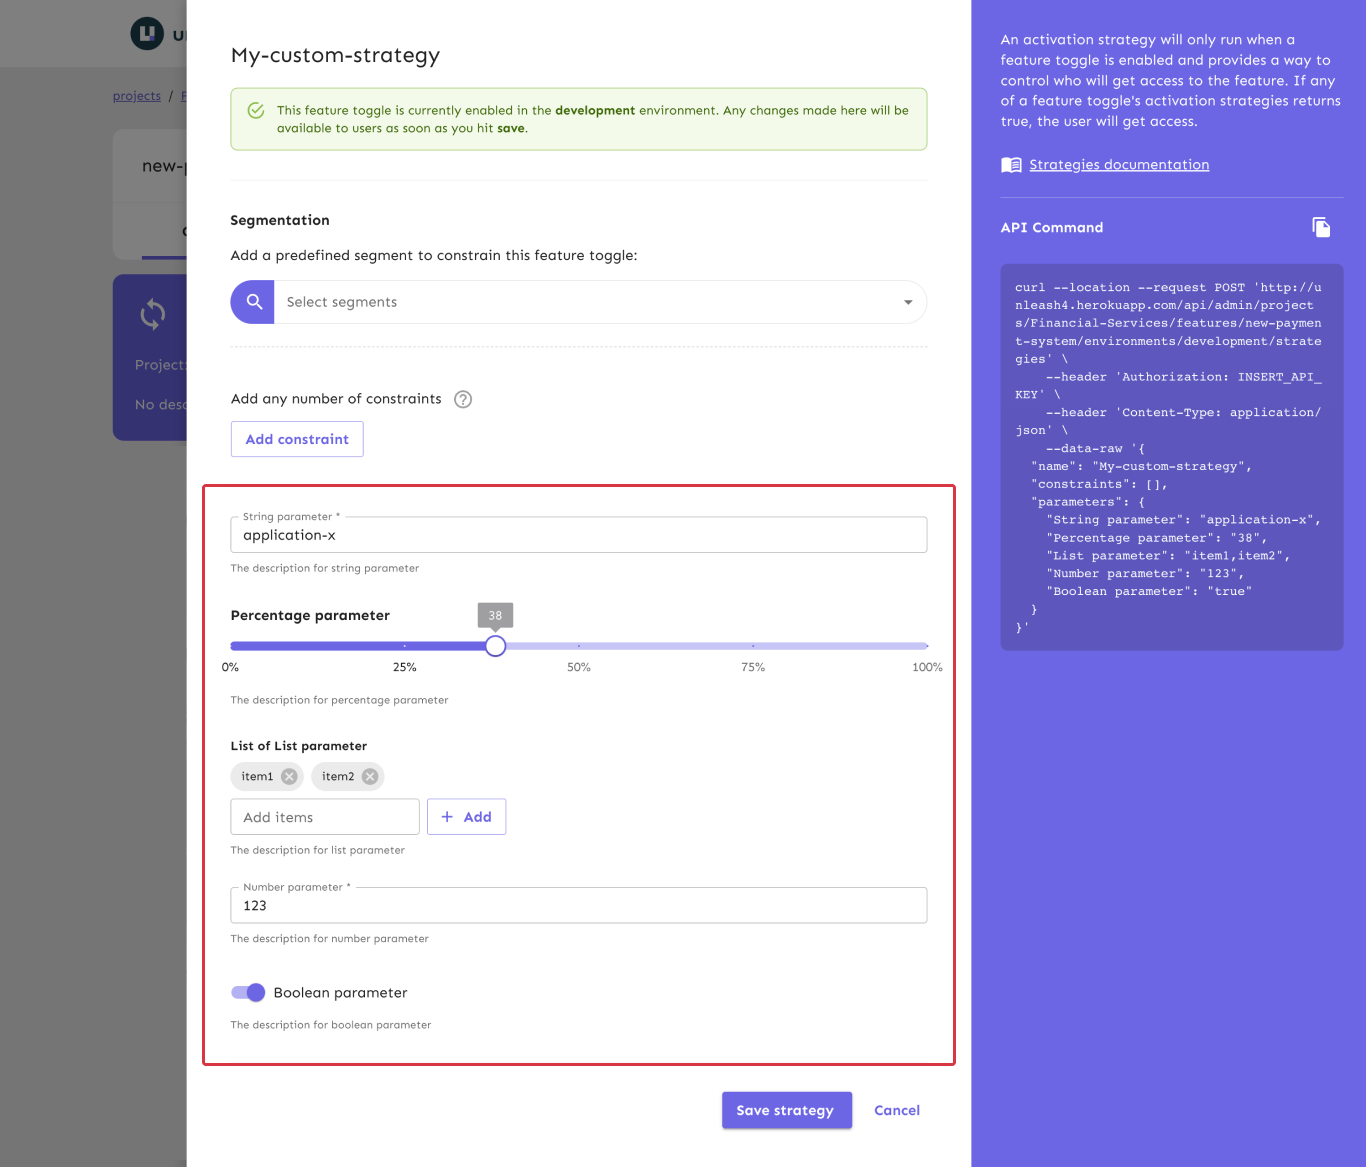
Parameters define the inputs available to your strategy. Each parameter can be marked as required or optional. This setting helps users understand which fields they must complete, but users can still save the strategy without filling out required parameters.
Each parameter includes:
- A name: Must be unique within the strategy.
- An optional description: Explains the purpose or expected format.
- A type: Determines the input field shown in the Admin UI and the value type in your code.
Each parameter type affects both the Admin UI control and the value representation in the JSON payload returned from the Unleash server. Actual data types depend on your SDK’s language.
By default, all parameter values are empty strings: "". If you don’t set a value, the SDK receives an empty string.
| Type name | Code representation | Example value | UI control |
|---|---|---|---|
| string | string | "a string" | A standard input field |
| percentage | string representing a number between 0 and 100 (inclusive) | "99" | A value slider |
| list | string (values are comma-separated) | "one,two" | A multi-input text field |
| number | string | "123" | A numeric text field |
| boolean | string: one of "true" or "false" | "true" | An on/off toggle |
Implementation
If the strategy isn’t implemented in your backend SDK, all checks using it return false because the SDK doesn’t recognize the strategy.
Custom strategies are defined on the Unleash server, but implemented in your backend SDK. All official Unleash backend SDKs provide a way to implement custom strategies. When implementing your custom strategy, you have access to both the strategy parameters and the Unleash context. See your SDK’s documentation for language-specific examples.