Role-based access control
Role-based access control
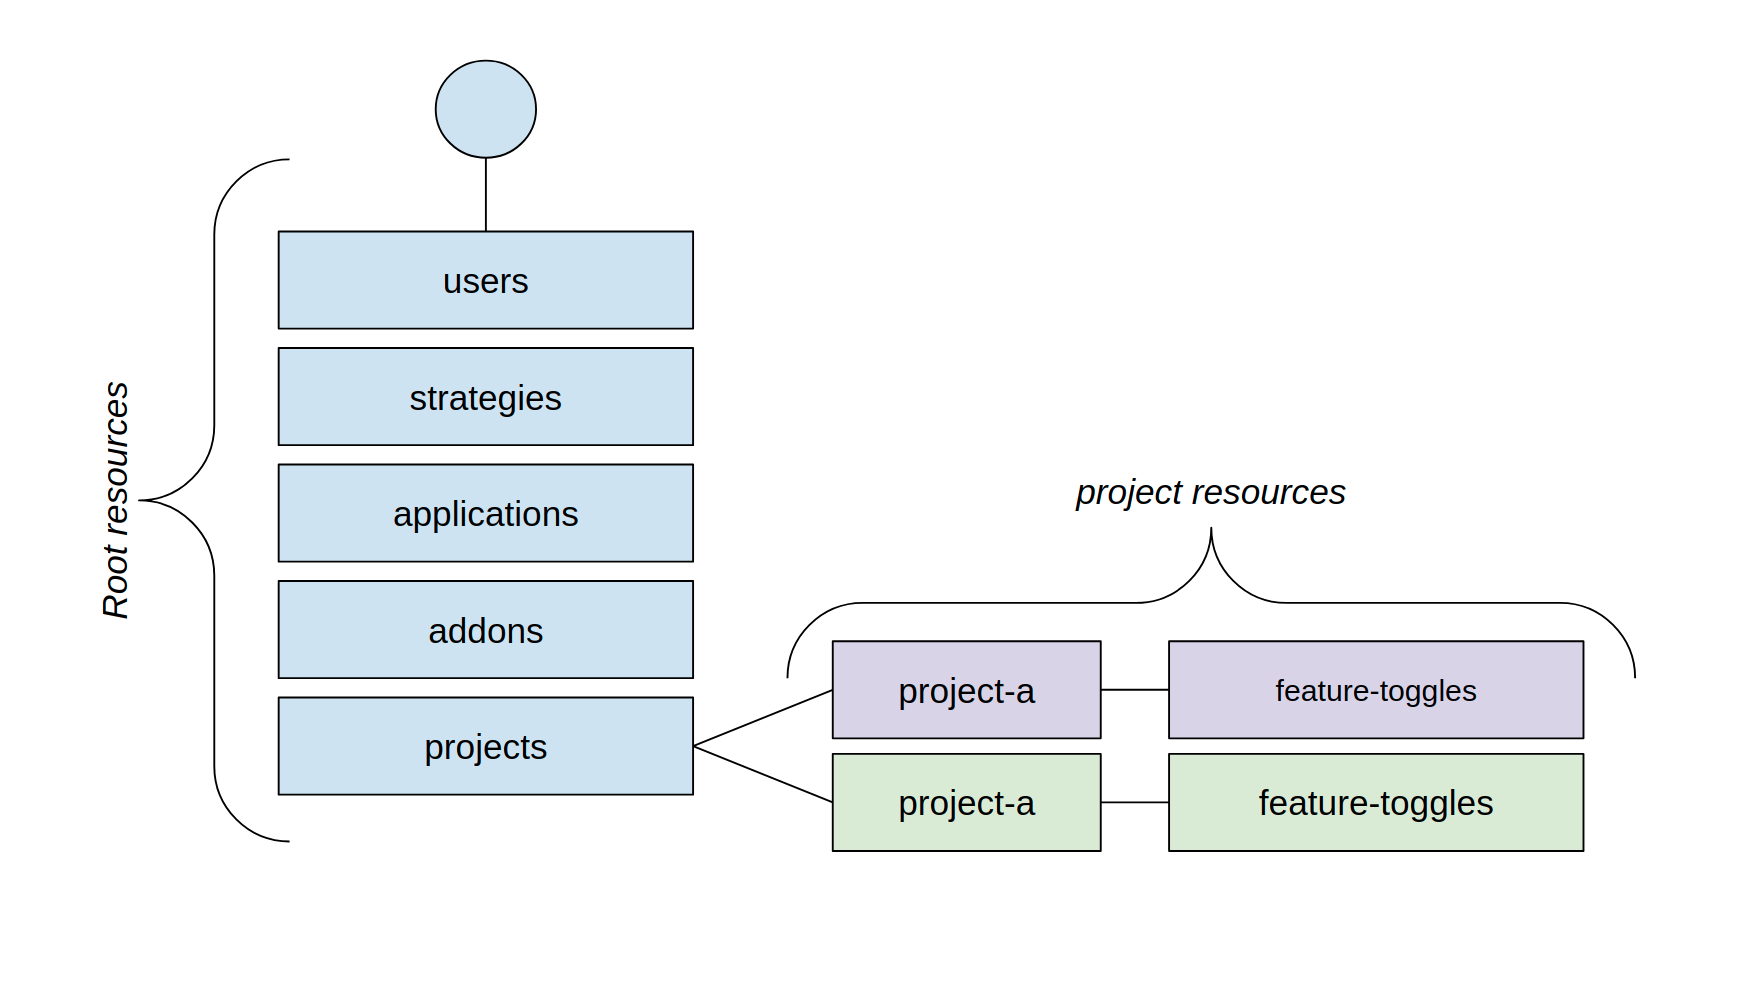
Unleash implements role-based access control on two levels:
- Root level - affects resources shared across the entire Unleash instance, for example activation strategies, users, integrations.
- Project level - affects resources specific to a project, such as feature flags, change requests, or API tokens.
Predefined roles
Unleash comes with a set of predefined roles. Root roles are available to all Unleash users, while the Project roles are only available to Enterprise users. The following table lists the roles, what they do, and what plans they are available in. Additionally, Enterprise users can create their own custom root roles and custom project roles.
Custom root roles
Custom root roles let you define your own root roles with a specific set of root permissions. The roles can then be assigned to entities (users, service accounts, and groups) at the root level. This allows you to control access to resources in a more precise, fine-grained way.
Each custom root role consists of:
- a name (required)
- a role description (required)
- a set of root permissions (required)
Create and assign a custom root role
To create a custom root role in the Admin UI, do the following:
- In Admin settings > User config > Root roles, click New root role.
- Give the role a name and description and select all permissions you want to assign to the role.
- Click Add role to save.
Once you have the role set up, you can assign it a user:
- In Admin settings > User config > Users, select the user you want to assign the role to.
- Click Edit user.
- For Role, select the root role you want the user to have.
- Click Save.
Root permissions
You can assign the following root permissions:
API token permissions
Permissions to manage API tokens.
Application permissions
Permissions to manage applications.
Authentication permissions
Permissions to manage authentication settings.
Context field permissions
Permissions to manage context fields.
Instance maintenance permissions
Permissions to manage instance-wide maintenance settings.
Integration permissions
Permissions to manage integrations.
Project permissions
Permissions to manage projects.
Release template permissions
Permissions to manage release templates.
Role permissions
Permissions to manage roles.
Segment permissions
Strategy permissions
Permissions to manage strategies.
Tag type permissions
Permissions to manage tag types.
Custom project roles
Custom project roles let you define your own project roles with a specific set of project permissions down to the environment level. The roles can then be assigned to users in specific projects. All users have viewer access to all projects and resources but must be assigned a project role to be allowed to edit a project’s resources.
Each custom project role consists of:
- a name (required)
- a role description (required)
- a set of project and environment permissions (required)
Create and assign a custom project role
To create a custom project role in the Admin UI, do the following:
- In Admin settings > User config > Project roles, click New project role.
- Give the role a name and description and select all permissions you want to assign to the role.
- Click Add role to save.
Once you have the role set up, you can assign it to individual users inside a project:
- In Settings > User access, click Edit.
- For Role, select the custom project roles you want to apply.
- Click Save.
Project-level permissions
You can assign the following project-level permissions. These permissions are valid across all of the project’s environments.
API tokens
Change requests
Features and strategies
Projects
Environment-level permissions
You can assign the following permissions on a per-environment level within the project:
Multiple project roles
Multiple project roles allow you to assign multiple project roles to a user or group within a project. By doing so, you can effectively merge the permissions associated with each role, resulting in a comprehensive set of permissions for the user or group in question. This ensures that individuals or teams have all the access they require to complete their tasks, as the system will automatically grant the most permissive rights from the combination of assigned roles.
This multi-role assignment feature can be particularly beneficial in complex projects with dynamic teams where a user or group needs to wear multiple hats. For example, a team member could serve as both a developer and a quality assurance tester. By combining roles, you simplify the access management process, eliminating the need to create a new, custom role that encapsulates the needed permissions.
View a user’s roles and permissions
The access overview page shows exactly what a user can do in Unleash, in a single view. The page is organized into two sections:
- Instance access: The user’s root role, shown as a badge next to Root access. Expand the row to see every root-level permission and whether the user has it.
- Project access: A count of the projects the user can access. Use the project and environment filters to view a specific project. Each project expands to show feature and strategy permissions, and a per-environment breakdown.
To view a user’s access overview, go to Admin settings > User config > Users, select a user, and click Access overview.
User groups
User groups allow you to manage user permissions efficiently by assigning roles to a collection of users instead of individually. This is particularly useful for projects with many users.
You can create and manage user groups in the Admin UI at Admin settings > User config > Groups.
When creating a user group, you can define the following:
- Name: A unique identifier for the group.
- Description: A brief explanation of the group’s purpose.
- Users: A list of users who are members of this group.
- SSO groups to sync from: A list of single sign-on (SSO) groups to synchronize members from.
- Root role: A role assigned to the group at the root level. (Available in v5.1+)
Groups themselves do not grant permissions. To be functional, a group must either:
- Be assigned a root role. Members of this group will inherit the root role’s permissions globally.
- Be assigned a role on a specific project. This grants the group’s members the specified permissions within that project. You can assign both predefined and custom project roles to groups.
A user can belong to multiple groups, and each group a user belongs to can have a different role assigned to it on a specific project. If a user gains permissions for a project through multiple groups, they will inherit the most permissive set of permissions from all their assigned group roles for that project.
Set up group SSO syncing
You can integrate user groups with your single sign-on (SSO) provider to automatically manage user assignments. Note that this just-in-time process updates groups only when a user logs in, which differs from a full provisioning system like SCIM that syncs all user information proactively.
When a user logs in through SSO, they are automatically added to or removed from a user group based on their SSO group membership. Manually added users are not affected by the SSO sync.
To enable group syncing, you configure two settings in your SSO provider configuration:
- Enable group syncing: Turns the feature on.
- Group field JSON path: A JSON path expression that points to the field in your SSO token response that contains the user’s groups.
For example, if your token response looks like this, you would set the Group field JSON path to groups:
After you enable syncing, you must link the SSO group names to the corresponding user group.
Once you’ve enabled group syncing and set an appropriate path, you’ll need to add the SSO group names to the Unleash group. This can be done by navigating to the Unleash group you want to enable sync for and adding the SSO group names to the “SSO group ID/name” property.
Configure SSO group sync
You must be an Admin in Unleash to perform these steps.
- Go to Admin settings > Single sign-on. Select your integration and click Enable Group Syncing.
- in Group Field JSON Path, enter the JSON path for the groups field in your token response.
- Click Save.
- Go to User config > Groups and select the user group you want to sync and click Edit.
- Add the exact SSO group names or IDs you want to link to the group.
- Click Save.
The next time a user who belongs to one of the linked SSO groups logs in, they are automatically added to the user group. If they have been removed from the SSO group, their access will be revoked on their next login.
create/overwrite variants (PUT)
and
update variants (PATCH) API endpoints, but it is not used for anything within the admin UI.
These API endpoints have been superseded by the environment-scoped endpoints:
create/overwrite environment variants (PUT)
and
update environment variants (PATCH), respectively.