Set up SSO with OpenID Connect
Plan: Enterprise
Introduction
In this guide we will do a deep dive on the Single-Sign-On (SSO) using the OpenID Connect protocol and connect it with Okta as IdP. Unleash supports other identity providers and protocols, have a look at all available Single-Sign-On options
Basic configuration
Step 1: Sign-in to Unleash
In order to configure SSO you will need to log in to the Unleash instance with a user that have "Admin" role. If you are self-hosting Unleash then a default user will be automatically created the first time you start Unleash:
- username:
admin - password:
unleash4all
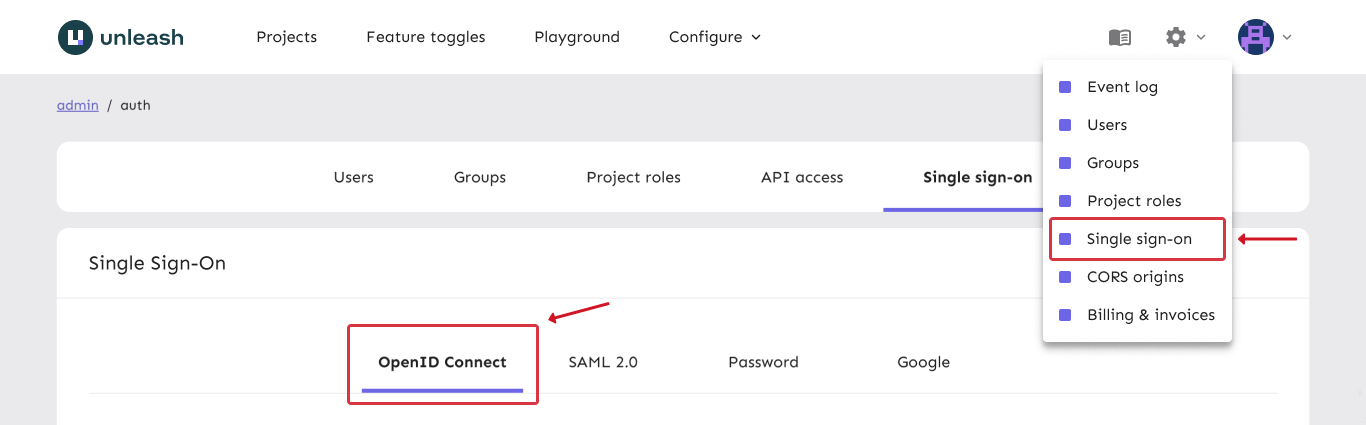
Step 2: Navigate to SSO configuration
Unleash enterprise supports multiple authentication providers, and we provide in depth guides for each of them. To find them navigate to "Admin" => "Single-Sign-On" section.
Step 3: Okta with OpenID Connect
Open a new tab/window in your browser and sign in to your Okta account. We will need to create a new Application which will hold the settings we need for Unleash.
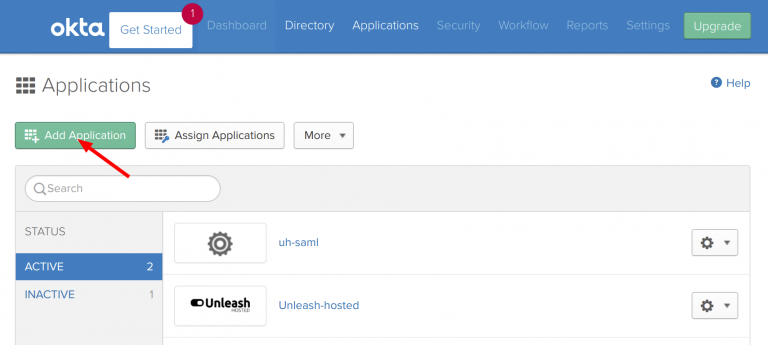
a) Create new Okta application
Navigate to “Admin/Applications” and click the “Add Apps” button.
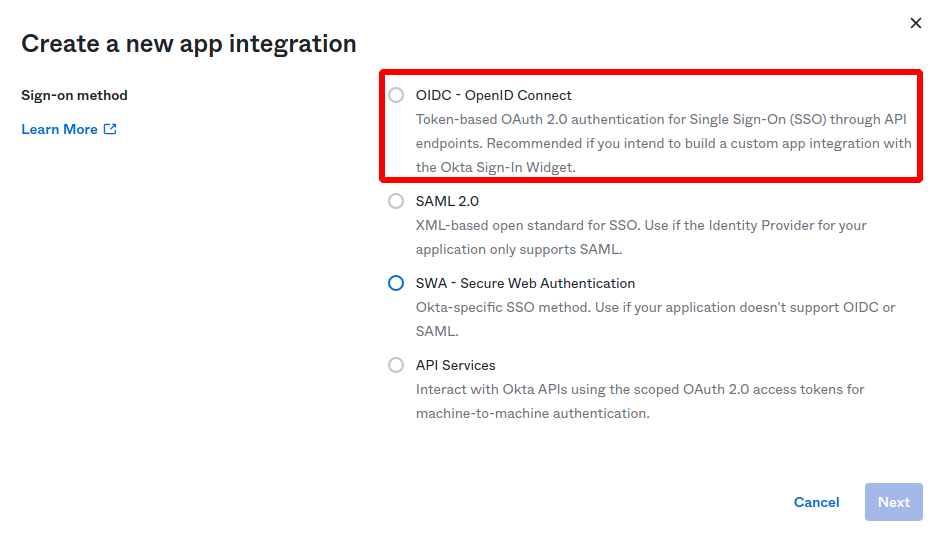
Then click “Create Application” and choose a new “OIDC - OpenID Connect” application, and choose application type "Web Application" and click create.
b) Configure Application Integration
Give you application a name. And set the Sign-in redirect URI to:
https://[region].app.unleash-hosted.com/[instanceName]/auth/oidc/callback
(In a self-hosted scenario the URL must match your UNLEASH_URL configuration)
You can also configure the optional Sign-out redirect URIs: https://[region].app.unleash-hosted.com/[instanceName]/
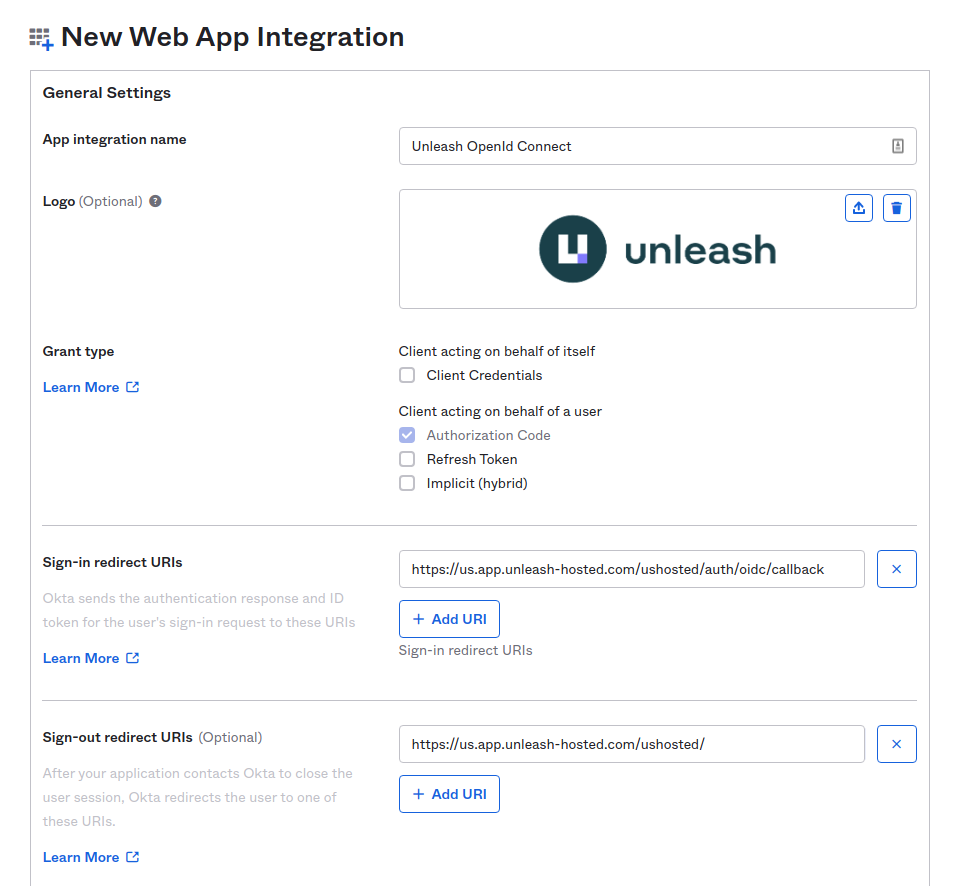
Save your new application and you will get the required details you need to configure the Unleash side of things:
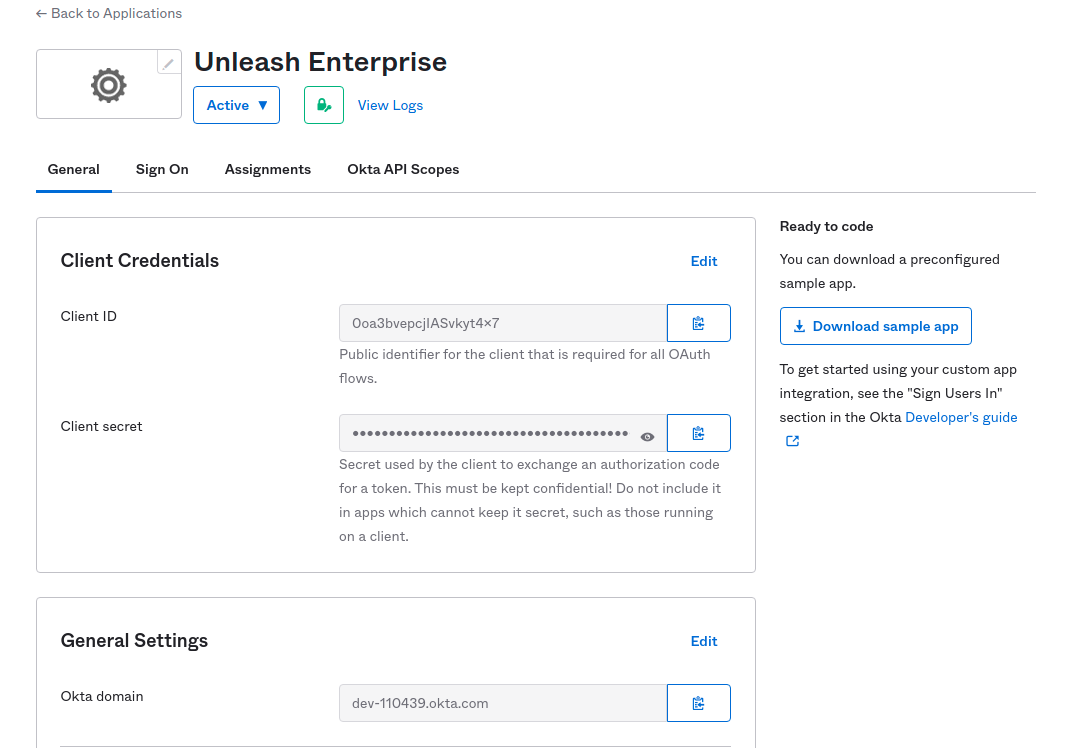
c) Configure OpenID Connect provider in Unleash
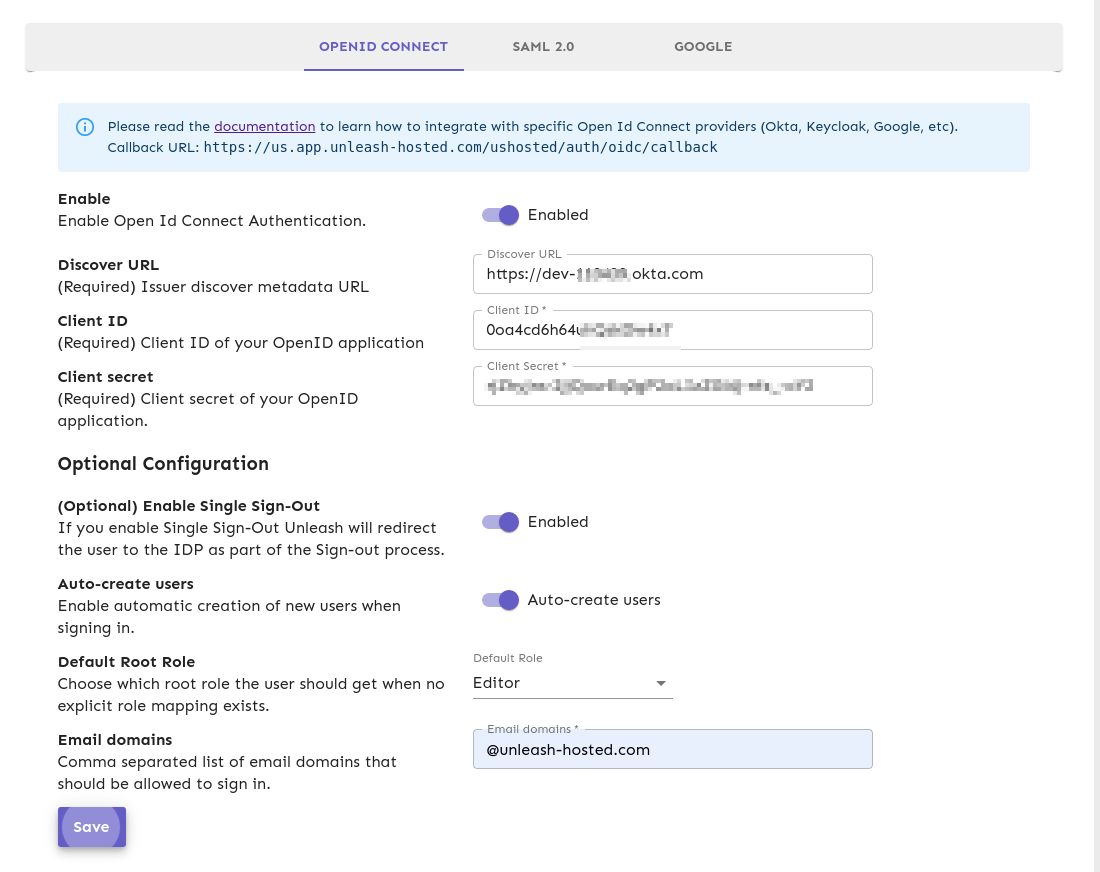
Navigate to Unleash and insert the details (Discover URL, Client Id and Client Secret) into Unleash.
Please note that the
Discover URLmust be a valid URL and must include thehttps://prefix. For example: https://dev-example-okta.com is a valid discovery URL.
You may also choose to “Auto-create users”. This will make Unleash automatically create new users on the fly the first time they sign-in to Unleash with the given SSO provider (JIT). If you decide to automatically create users in Unleash you must also provide a list of valid email domains. You must also decide which root Unleash role they will be assigned (Editor role will be the default).
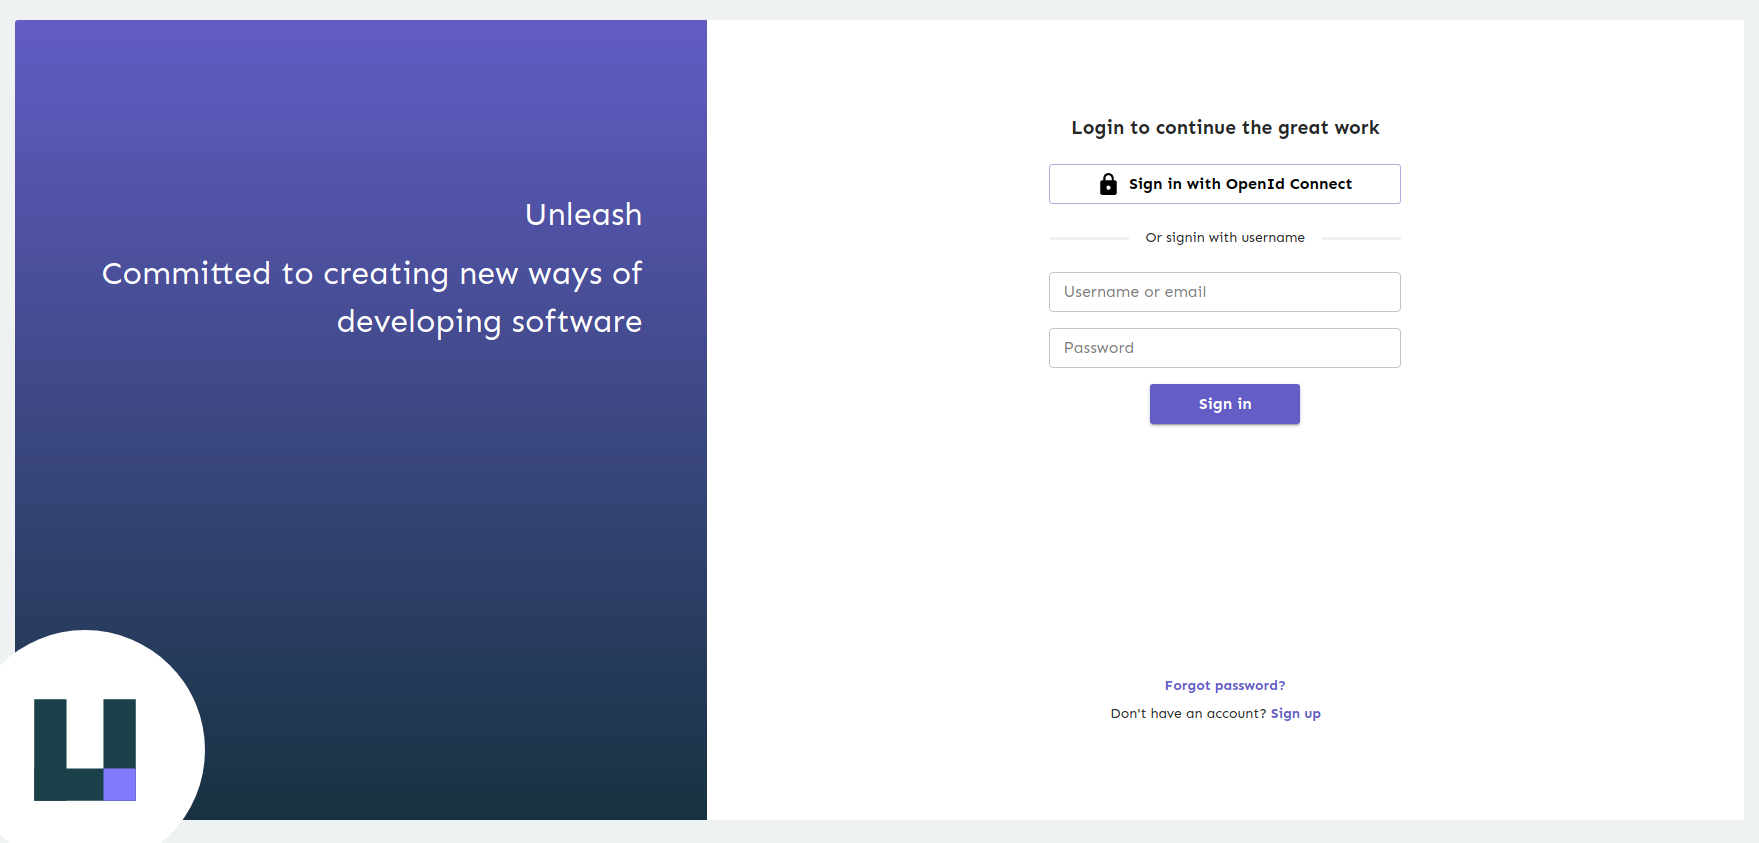
Step 4: Verify
Log out of Unleash and sign back in again. You should now be presented with the "Sign in with OpenID Connect" option. Click the button and follow the sign-in flow. If all goes well you should be successfully signed in to Unleash.
(If something is not working you can still sign-in with username and password).
Success!
Configuration via Environment variables (Since Unleash Enterprise 6.1.0)
Beware, configuring OIDC through environment variables will disable editing settings in the Administration GUI. If you want to fallback to the GUI, make sure the OIDC_ENABLED is not set and then restart Unleash.
Step 1 Setup required variables for OIDC (minimal setup)
| Variable name | Purpose | Required | Example values |
|---|---|---|---|
| OIDC_ENABLED | Tells Unleash to use environment variables for configuring OIDC | yes | true / false (false will turn off OIDC login) |
| OIDC_DISCOVER_URL | URL used to dynamically retrieve the OIDC configuration | yes | https://myoidchost.azure.com/.well-known/openid-configuration |
| OIDC_CLIENT_ID | The OIDC client ID of this application. | yes | FB87266D-CDDB-4BCF-BB1F-8392FD0EDC1B |
| OIDC_CLIENT_SECRET | Shared secret from OpenID server. Used to authenticate login requests | yes | qjcVfeFjEfoYAF3AEsX2IMUWYuUzAbXO |
Once these are configured OIDC should be working.
Step 2 (optional) - Auto create users from specific email domains
| Variable name | Purpose | Required | Example values |
|---|---|---|---|
| OIDC_AUTO_CREATE | Tells Unleash to auto create users from the specific domains in OIDC_AUTO_CREATE_EMAIL_DOMAINS | no | true / false |
| OIDC_AUTO_CREATE_EMAIL_DOMAINS | A comma separated list of domains to auto-create users for, if not set accepts all domains | no | getunleash.io,getunleash.ai |
Step 3 (optional) Enable group syncing
| Variable name | Purpose | Required | Example values |
|---|---|---|---|
| --------------------------- | -------------------------------------------------------------------------------------------------------- | ---------- | ----------------- |
| OIDC_ENABLE_GROUP_SYNCING | Tell Unleash to setup group syncing from OIDC login requests (defaults to false) | No | true or false |
| OIDC_GROUP_JSON_PATH | a json path expression telling where in the response Unleash can find the group membership information | No | groups |
| OIDC_ADD_GROUPS_SCOPE | Tells Unleash to add the groups access scope to the request (defaults to false) | No | true / false |
| OIDC_DEFAULT_ROOT_ROLE | Which role to grant users auto created from SSO, defaults to Viewer | No | 'Viewer', 'Editor', 'Admin' |
Step 4 (optional) - Further customizations
| Variable name | Purpose | Required | Example values |
|---|---|---|---|
| OIDC_ACR_VALUES | Authentication Context Class Reference, used to request extra values in the acr claim returned from the server. If multiple values are required, they should be space separated. | no | |
| OIDC_ID_TOKEN_SIGNING_ALGORITHM | Only use this if your provider is failing with unsupported algorithm, the default should be fine here | No | RS256, RS384, RS512 |
| OIDC_ENABLE_SINGLE_SIGN_OUT | Should Unleash call the single signout of the OIDC endpoint (defaults to false) | No | true / false |