Set up SSO with SAML 2.0 and Okta
Introduction
In this guide we will do a deep dive on the Single-Sign-On (SSO) integration with SAML 2.0 and connect it with Okta as IdP. Unleash support other identity providers and protocols, have a look at all available Single-Sign-On options
Basic configuration
Step 1: Sign-in to Unleash
In order to configure SSO you will need to log in to the Unleash instance with a user that have “Admin” role. If you are self-hosting Unleash then a default user will be automatically created the first time you start Unleash:
- username:
admin - password:
unleash4all
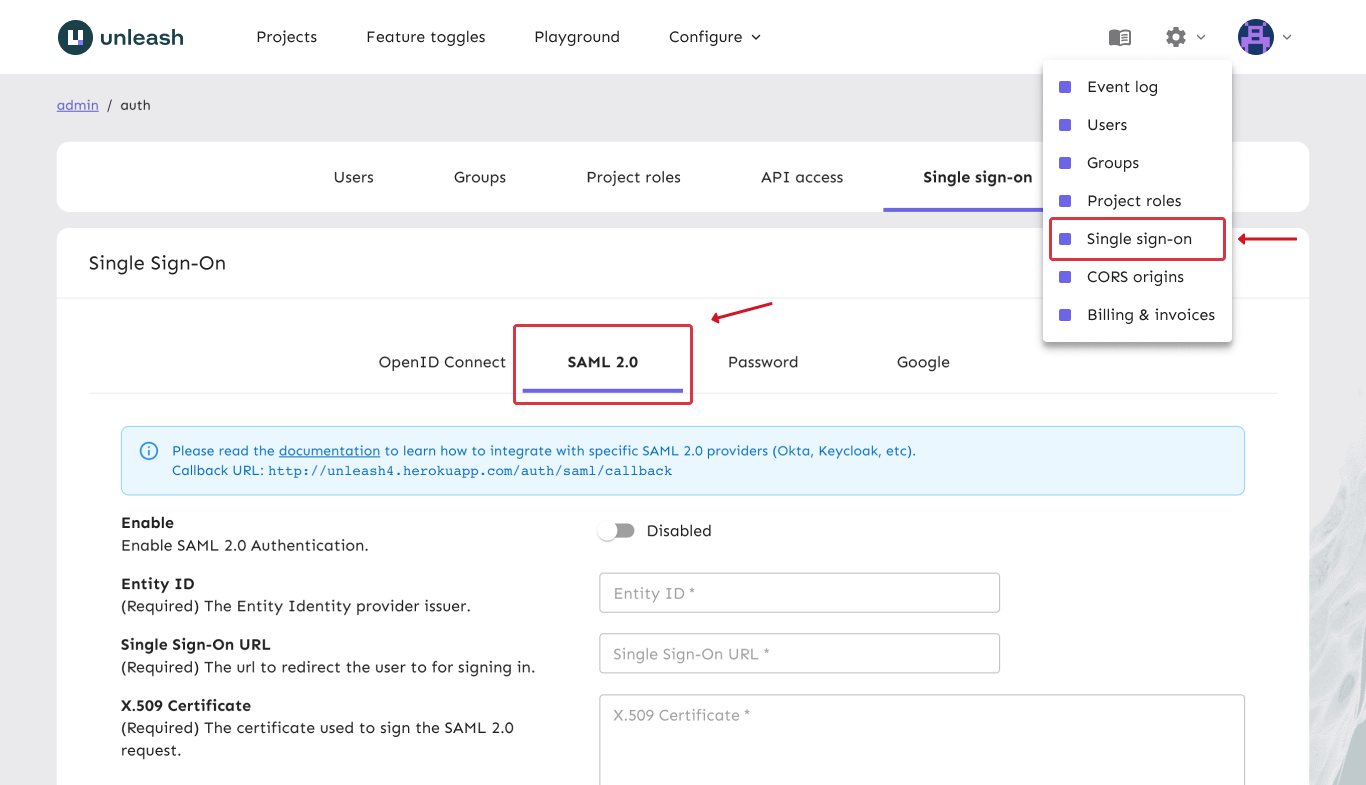
Step 2: Navigate to SSO configuration
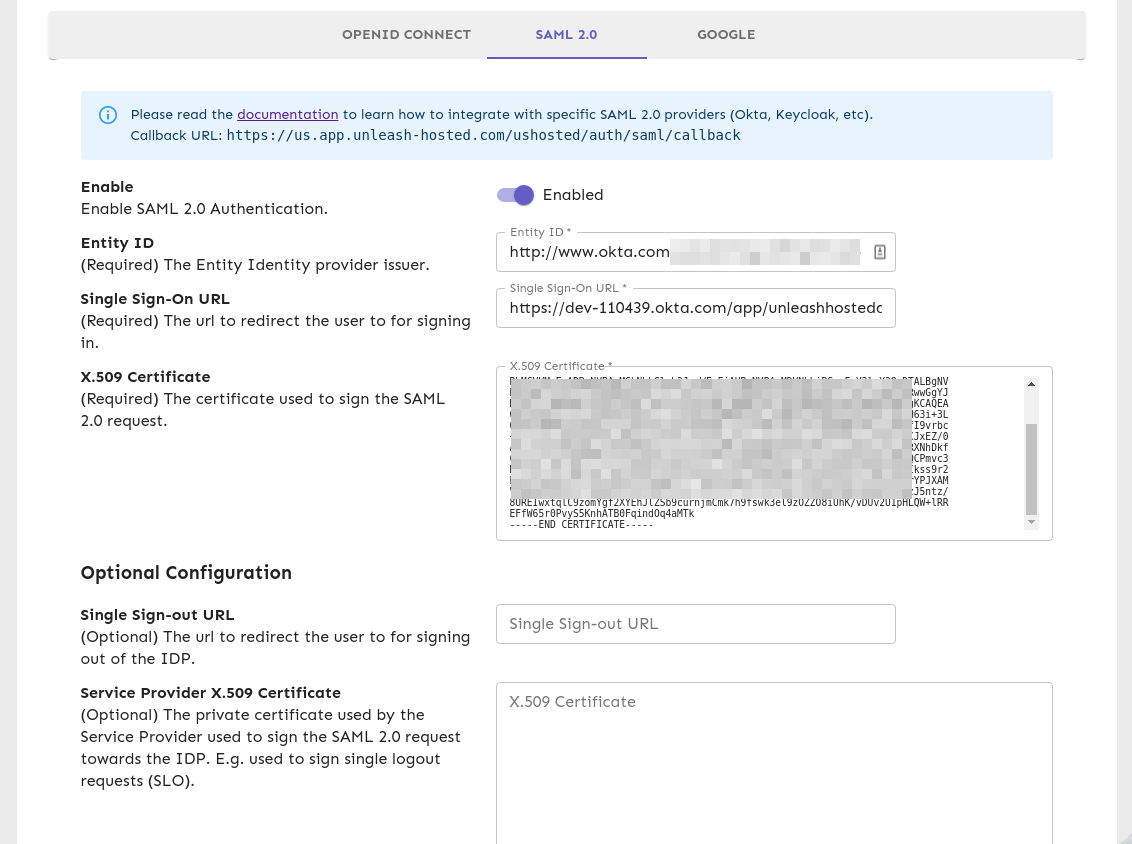
In order to configure SSO with SAML with your Unleash enterprise you should navigate to the Single-Sign-On configuration section and choose the “SAML 2.0” tab.
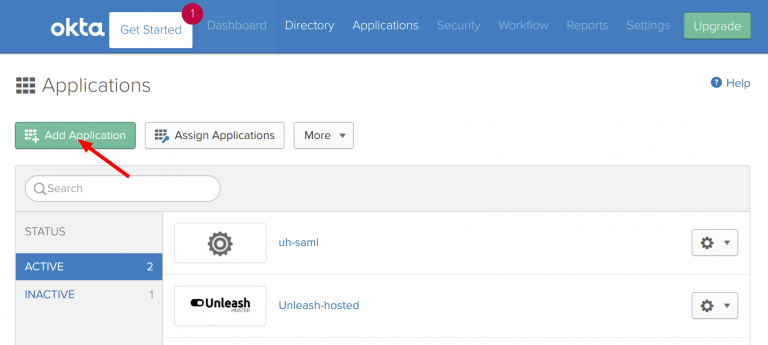
Step 3: Create an application in Okta
Open a new tab/window in your browser and sign in to your Okta account. We will need to create a new Application which will hold the settings we need for Unleash.
a) Navigate to “Admin -> Applications” and click the “Add Application” button.
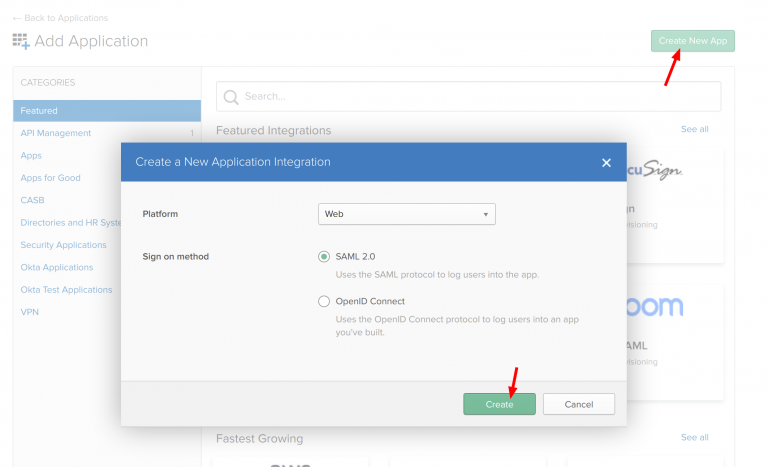
b) Click “Create New App and choose a new “SAML 2.0” application and click create
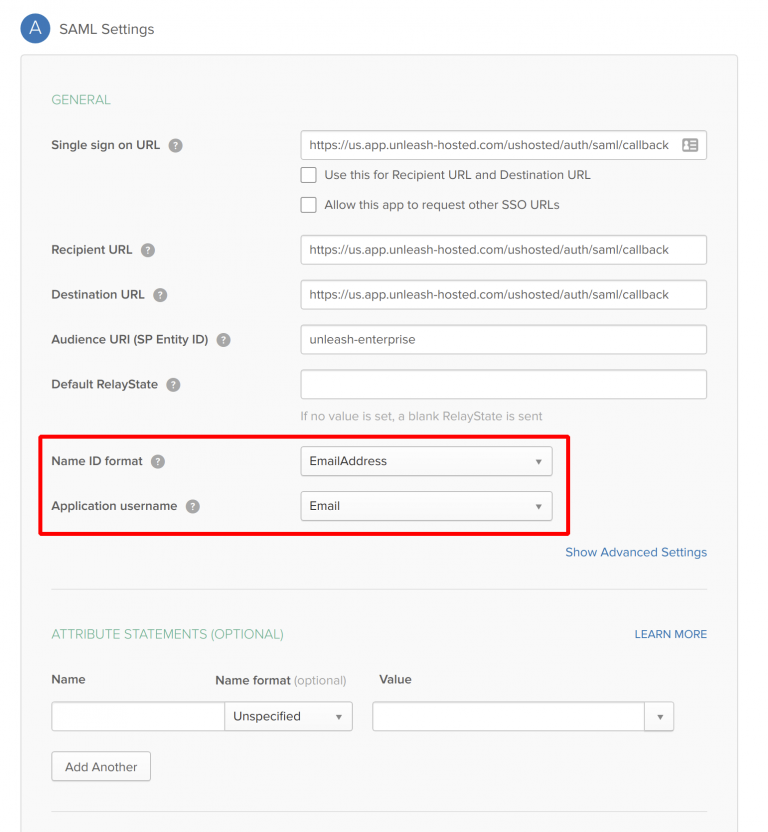
c) Configure SAML 2.0
Unleash expects an email to be sent from the SSO provider so make sure Name ID format is set to email. Also you must give the IdP Initiated SSO URL Name, we have chosen to call it “unleash-enterprise”. This gives us the Sign-on URL we will need in our Unleash configuration later.
Additionally, you may provide the following attributes:
- firstName
- lastName
(These will be used to enrich the user data in Unleash).
Please make sure to replace URLs with the public URL for your Unleash instance. This will require correct region prefix and the instance name. The example above uses region=“us” and instance-name=“ushosted”.
The correct format is: https://[region].app.unleash-hosted.com/[instanceName]/auth/saml/callback
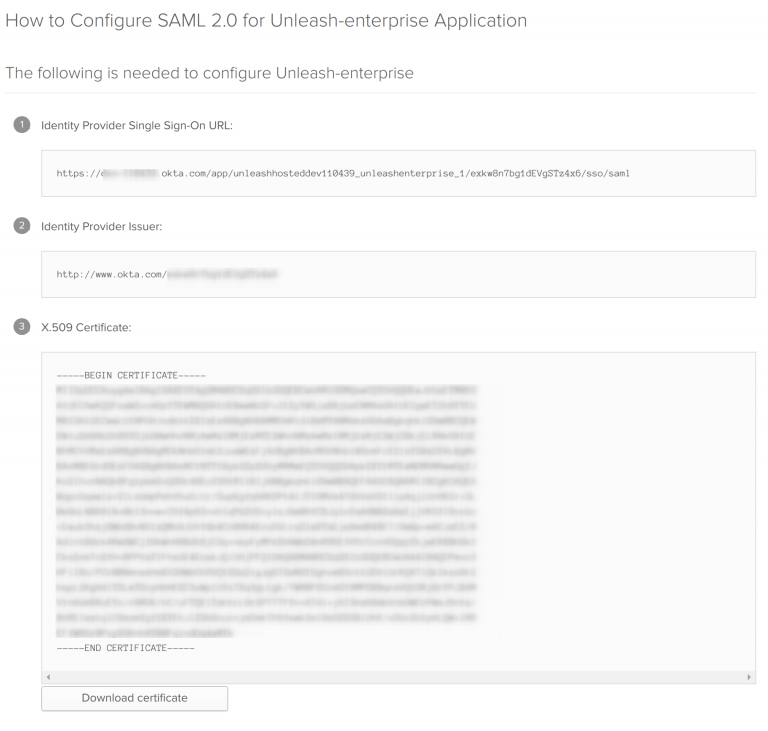
d) Get the Okta Setup Instructions
Click the “View Setup Instructions” to get the necessary configuration required for Unleash.
Step 4: Configure SAML 2.0 provider in Unleash
Go back to Unleash Admin Dashboard and navigate to Admin Menu -> Single-Sign-On -> SAML. Fill in the values captured
in the “Get the Okta Setup Instructions” step.
You may also choose to “Auto-create users”. This will make Unleash automatically create new users on the fly the first time they sign-in to Unleash with the given SSO provider (JIT). If you decide to automatically create users in Unleash you must also provide a list of valid email domains. You must also decide which root Unleash role they will be assigned (Editor role will be the default).
Step 5: Validate
You have now successfully configured Unleash to use SAML 2.0 together with Okta as an IdP. Please note that you also must assign users to the application defined in Okta to actually be able to log-in to Unleash.
Try signing out of Unleash. If everything is configured correctly you should be presented with the option to sign in with SAML 2.0.
Single-Sign-Out
Available from Unleash Enterprise 4.1.0
You may also configure Unleash to perform Single-Sign-Out. By enabling single-sign-out Unleash will redirect the user back to IdP as part of the sign-out process. You may optionally also sign the sign-out request (required by multiple IdP’s such as Okta).
Step 1: Generate private key & public certificate
(This step is only required if you intend to sign the sign-out requests).
Before you can configure single-sign-out support with Okta you are required to generate a Private Key together with a public certificate for that key. We recommend to use SHA256 certificates.
To create a public certificate and private key pair, use the proceeding commands. They work in Linux® and Mac® terminals.
Answer the promoted questions, and when you complete all the steps you should end up with two files:
private.pem- Private certificate, required by Unleash in order to sign requests.cert.pem- Public certificate, required by the IdP in order to validate requests from Unleash.
Step 2: Configure sign-out url in Okta
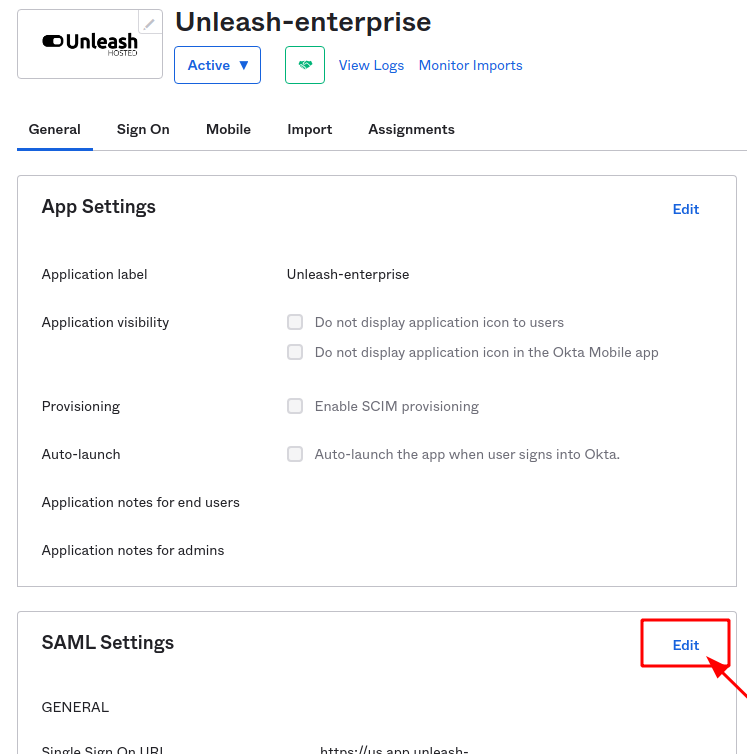
Login in to Okta and navigate to your Applications. Select the “Unleash” application you created, click on “General” and then “Edit SAML Settings”.
**Next, navigate to “Configure SAML” and click “show Advanced Settings” and check the Enable Single Logout option. **
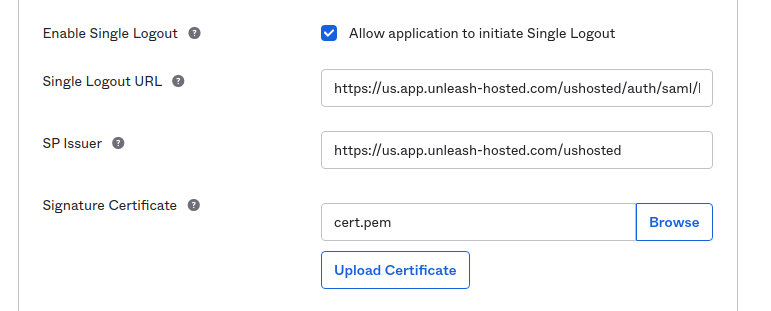
Please make sure to replace URLs with the public URL for your Unleash instance. This will require correct region prefix and the instance name. The example above uses region=“us” and instance-name=“ushosted”.
The correct format is: https://[region].app.unleash-hosted.com/[instanceName]/auth/saml/logout/done
You need to fill out the following options:
- Single Logout Url: https://[region].app.unleash-hosted.com/[instanceName]/auth/saml/logout/done
- SP Issuer: https://[region].app.unleash-hosted.com/[instanceName]
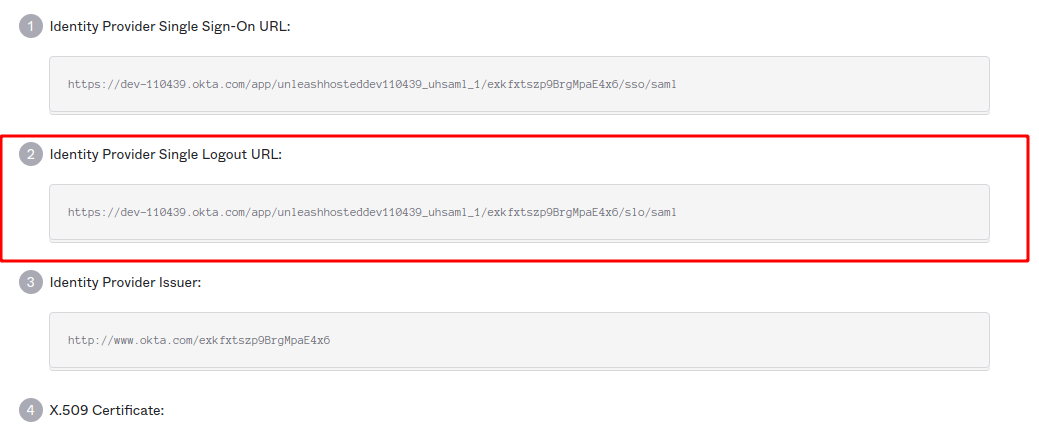
Next upload the public Certificate you generated in the previous step (cert.pem) and save the Okta SAML settings. Upon completion of this step you should be
provided with the ability to view setup instructions and now you should be provided with a “Identity Provider Single Logout URL”
Step 3: Configure Single-Sign-Out in Unleash
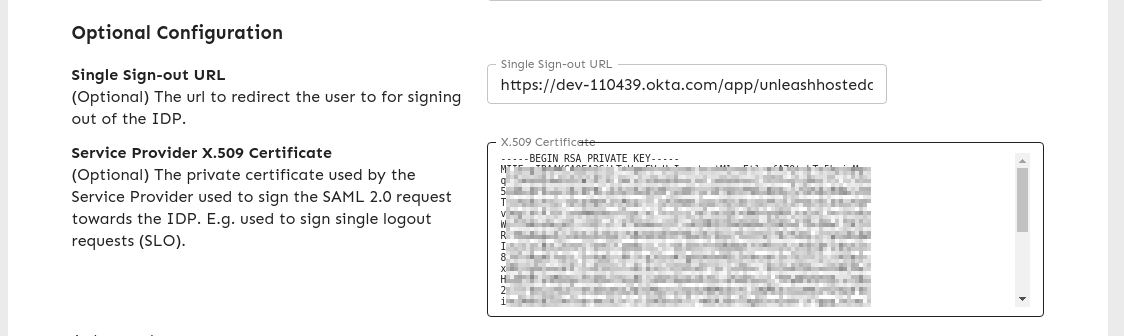
Go back to Unleash Admin Dashboard and navigate to Admin Menu -> Single-Sign-On -> SAML. Fill in the values captured in the “Single Logout URL” from Okta.
In the “Service Provide X.509 Certificate” field you should insert the value of your private key (private-pem). This is required in order to make Unleash able
to sign logout requests.
After you save these settings users will now be redirected to your IdP (Okta) and back to Unleash again after successfully signing out.
Configuration via Environment variables (Since Unleash Enterprise 6.1.0)
Beware, configuring OIDC through environment variables will disable editing settings in the Administration GUI. If you want to fallback to the GUI, make sure the SAML_ENABLED is not set and then restart Unleash. Your previous environment settings will have been persisted to the database and you can edit there.
Step 1 - Setup required environment variables for SAML (minimal config)
Having SAML configured via environment variables allows you to start Unleash with SAML authentication preconfigured.
You’ll need the following variables at the very least
Step 2 (optional) - Setup auto-creation of users from email domain
Step 3 (optional) - Add sign-out config
If you’ve read the [documentation for sign out config](link to chapter on sign out) above. You’ll still need to create the SSL certificate, you can store it on
disk or pass in the contents of private.pem as a string. You’ll need the following environment variables