React Feature Flag Examples
In our React tutorial, we implemented a simple on/off feature flag. In the real world, many feature flag use cases have more nuance than this. This document will walk you through some common examples of using feature flags in React with some of those more advanced use cases in mind.
Applications evolve, and teams must manage all aspects of this evolution, including the flags used to control the application. We built multiple features into Unleash to address the complexities of releasing code and managing feature flags along the way.
Gradual Rollouts for React Apps
It’s common to use feature flags to roll out changes to a percentage of users. Flags allow you to monitor your application and infrastructure for undesired behavior (such as errors, memory bottlenecks, etc.) and to see if the changes improve the outcomes for your application (to increase sales, reduce support requests, etc.)
Doing a gradual rollout for a React-based application with Unleash is very straightforward. To see this in action, follow our How to Implement Feature Flags in React tutorial, which implements a notification feature using feature flags.
Once you have completed the tutorial, you can modify the basic setup to adjust the percentage of users who experience this feature with a gradual rollout. The experience that the user is exposed to is cached for consistency.
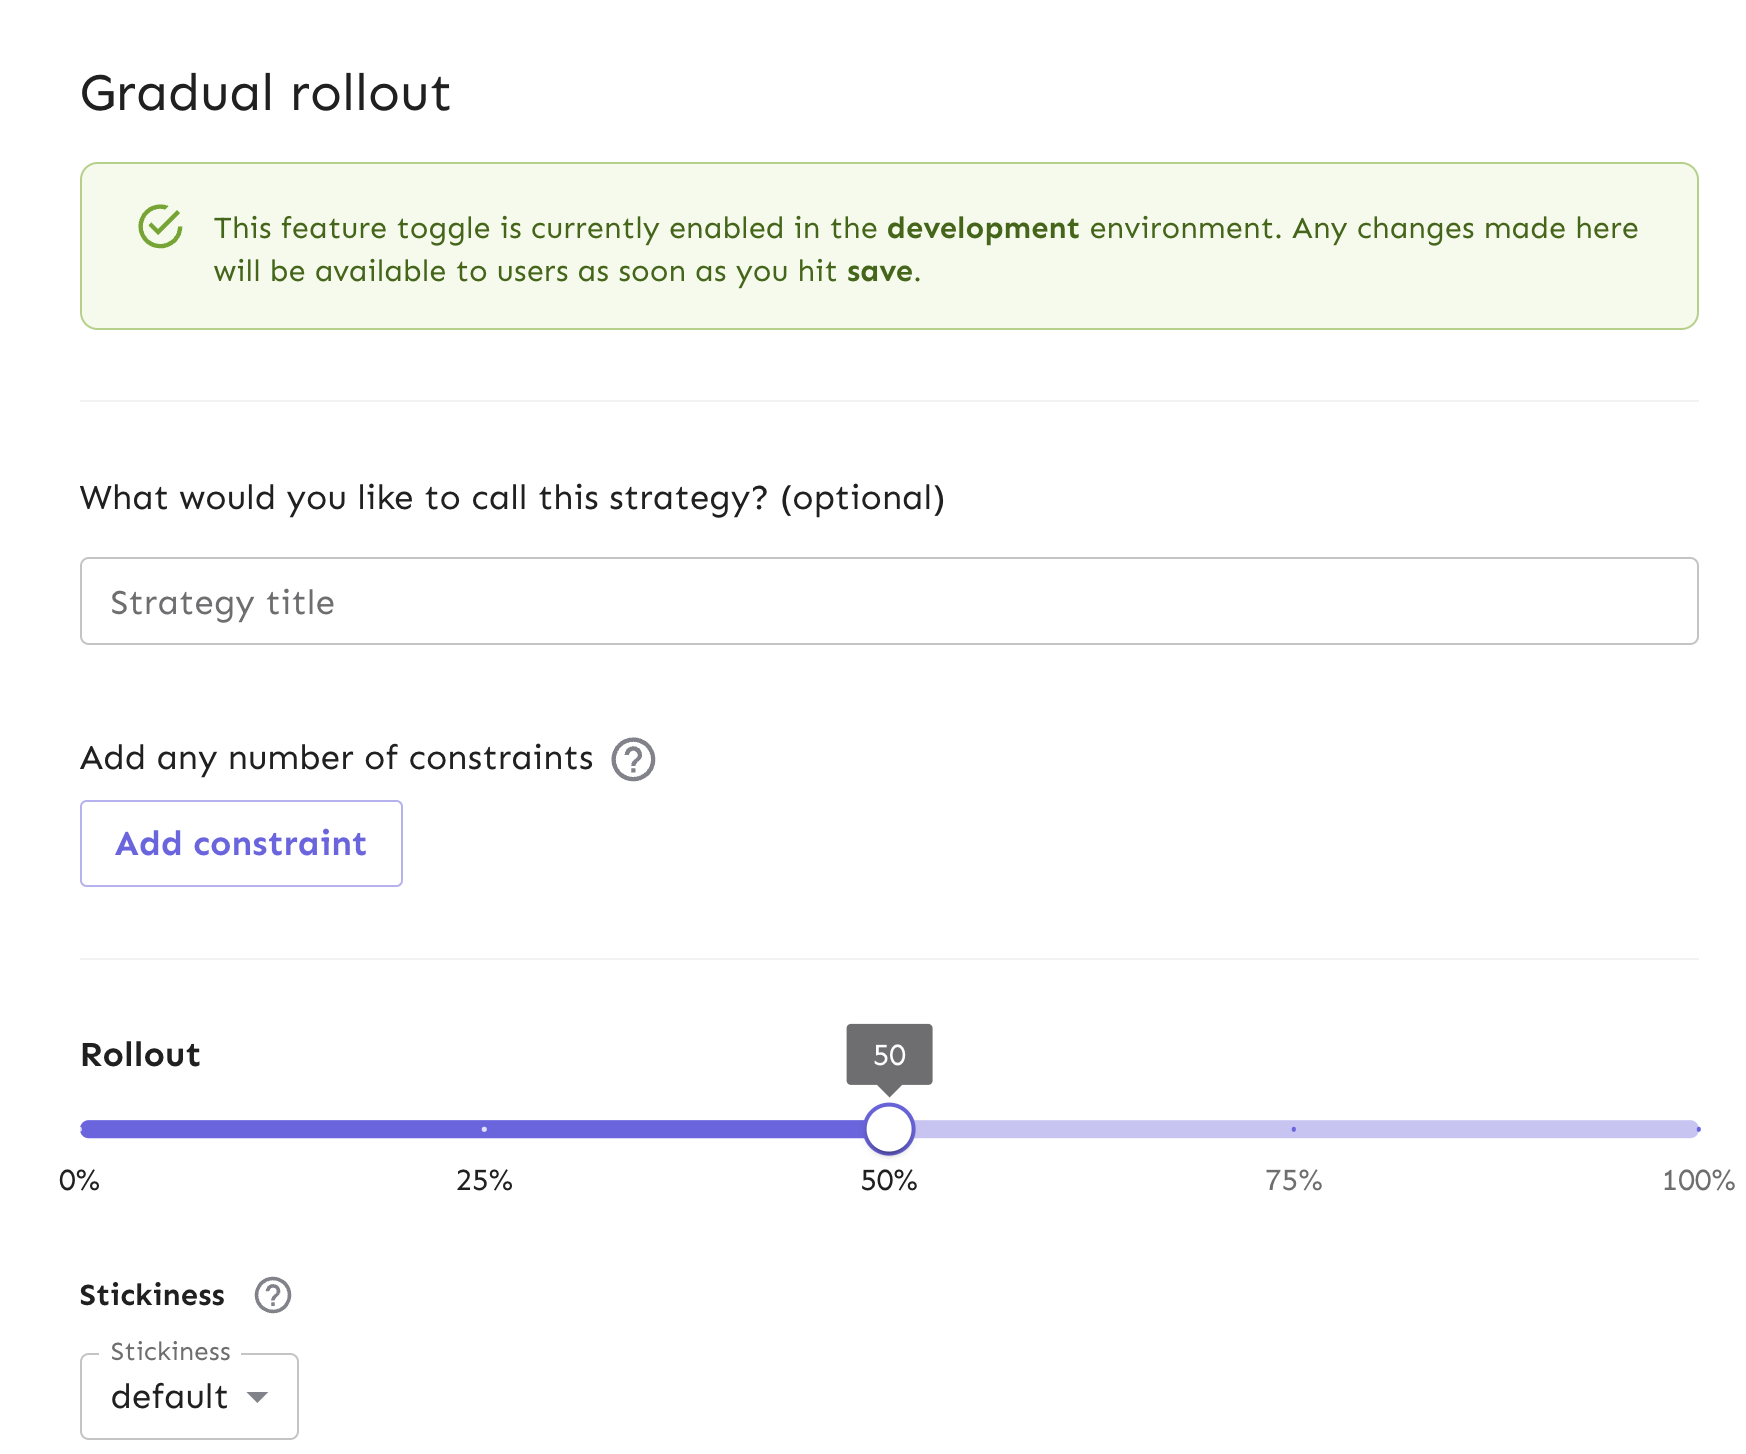
Navigate to the Gradual Rollout form in Unleash by using the “Edit strategy” button.

Adjust the percentage of users to 50% or whichever value you choose, and refresh your app in the browser to see if your user has the new feature experience.
You can achieve this same result using our API with the following code:
Learn more about gradual rollouts in our docs.
Canary Deployments in React
What is a canary deployment?
Canary deployments are a foundational approach for deploying new software versions with high confidence and low risk by exposing the new version to a limited audience. Canary releases are a way to test and release code in different environments for a subset of your audience, which determines which features or versions of the platform people have access to.
Why use canary deployments?
Canary deployments are a safer and more gradual way to make changes in software development. They help find any abnormalities and align with the agile process for faster releases and quick reversions.
How to leverage feature flags for canary deployments in React?
Feature flags provide the same benefits as canary deployments but with more granular control:
-
Precisely target specific user segments for feature rollouts.
-
Maintain session consistency (stickiness) if needed.
-
Test multiple features independently on different user groups simultaneously.
-
With feature flags, you can separate feature releases from deployments.
Often, canary deployments are managed at the load balancer level while feature flags act at the application level. In some instances, rolling out groups of features together behind a feature flag can serve the purpose of a canary deployment.
Unleash has a few ways to help manage canary deployments for React apps at scale:
-
Using a gradual rollout (which we implemented in a previous section) would be a simple use case but would reduce the amount of control you have over who gets the new feature.
-
Using either constraints or segments (which are a collection of constraints) for a subset of your users to get the new feature vs. the old feature, for more control than a gradual rollout
-
Strategy variants are used to do the same canary deployment, but can be scaled to more advanced cases. For example, if you have 2+ new features and are testing to see if they are better than the old one, you can use variants to split your population of users and conduct an A/B test with them.
Let’s walk through how to utilize strategy constraints in our React app through the Unleash platform.
Configure strategy constraints for canary deployments
We will build a strategy constraint on top of our existing gradual rollout strategy. This will allow us to target a subset of users to rollout to.
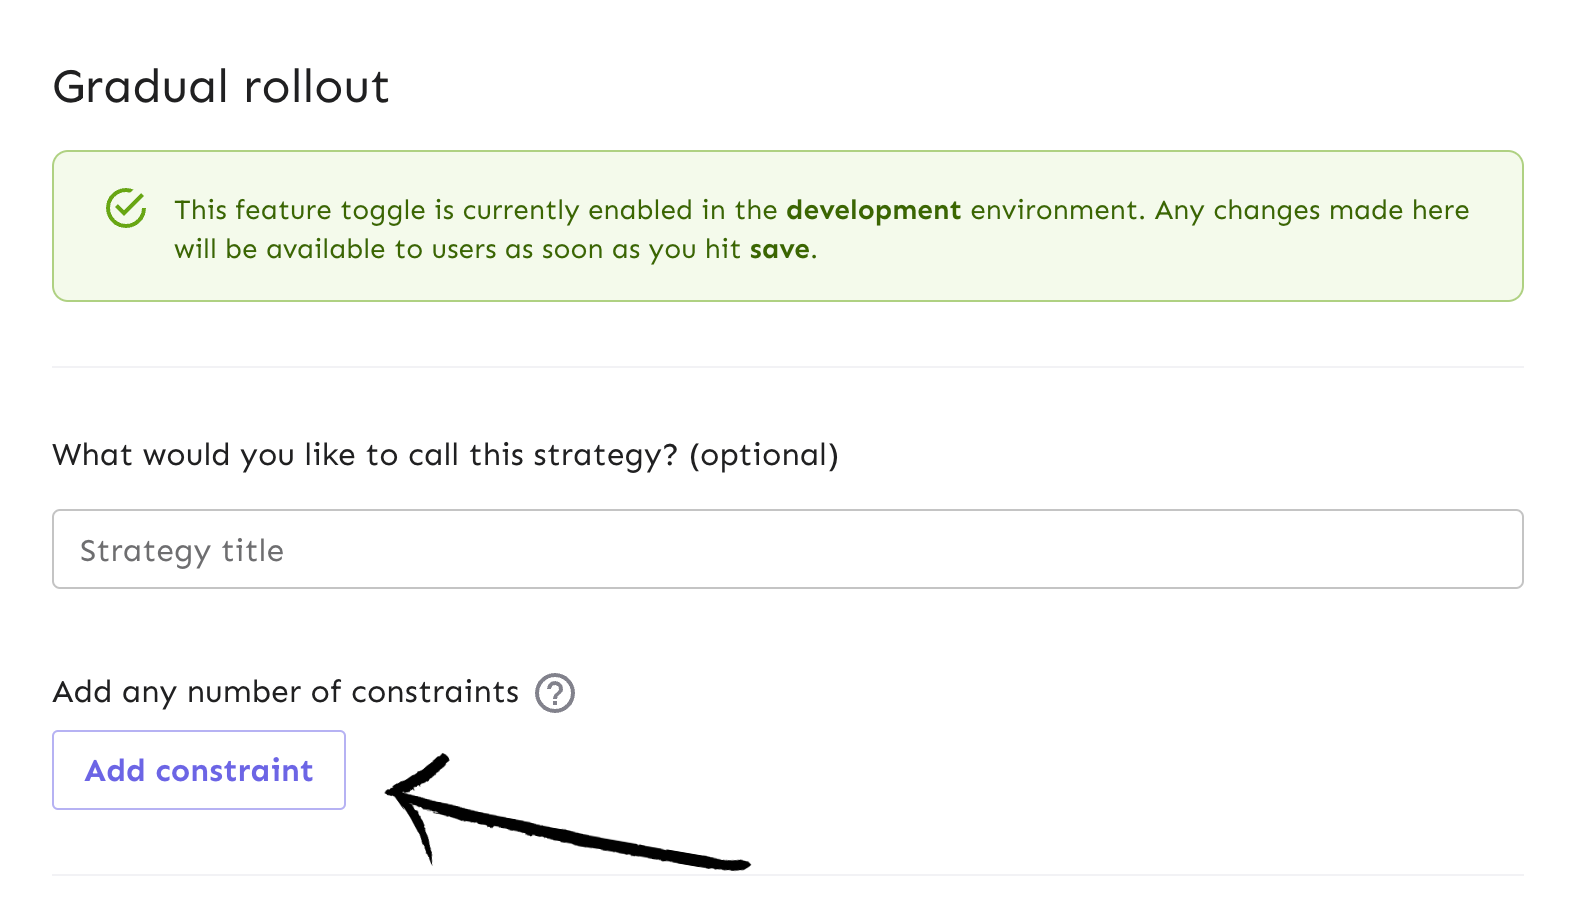
In Unleash, start from the feature flag view and edit your Gradual Rollout strategy from your development environment.
This will take you to the gradual rollout form. Click on the ‘Add constraint’ button.
Let’s say we are experimenting with releasing the notifications feature for a limited time. We want to release it to all users, capture some usage data to compare it to the old experience, and then automatically turn it off.
We can configure the constraint in the form to match these requirements:
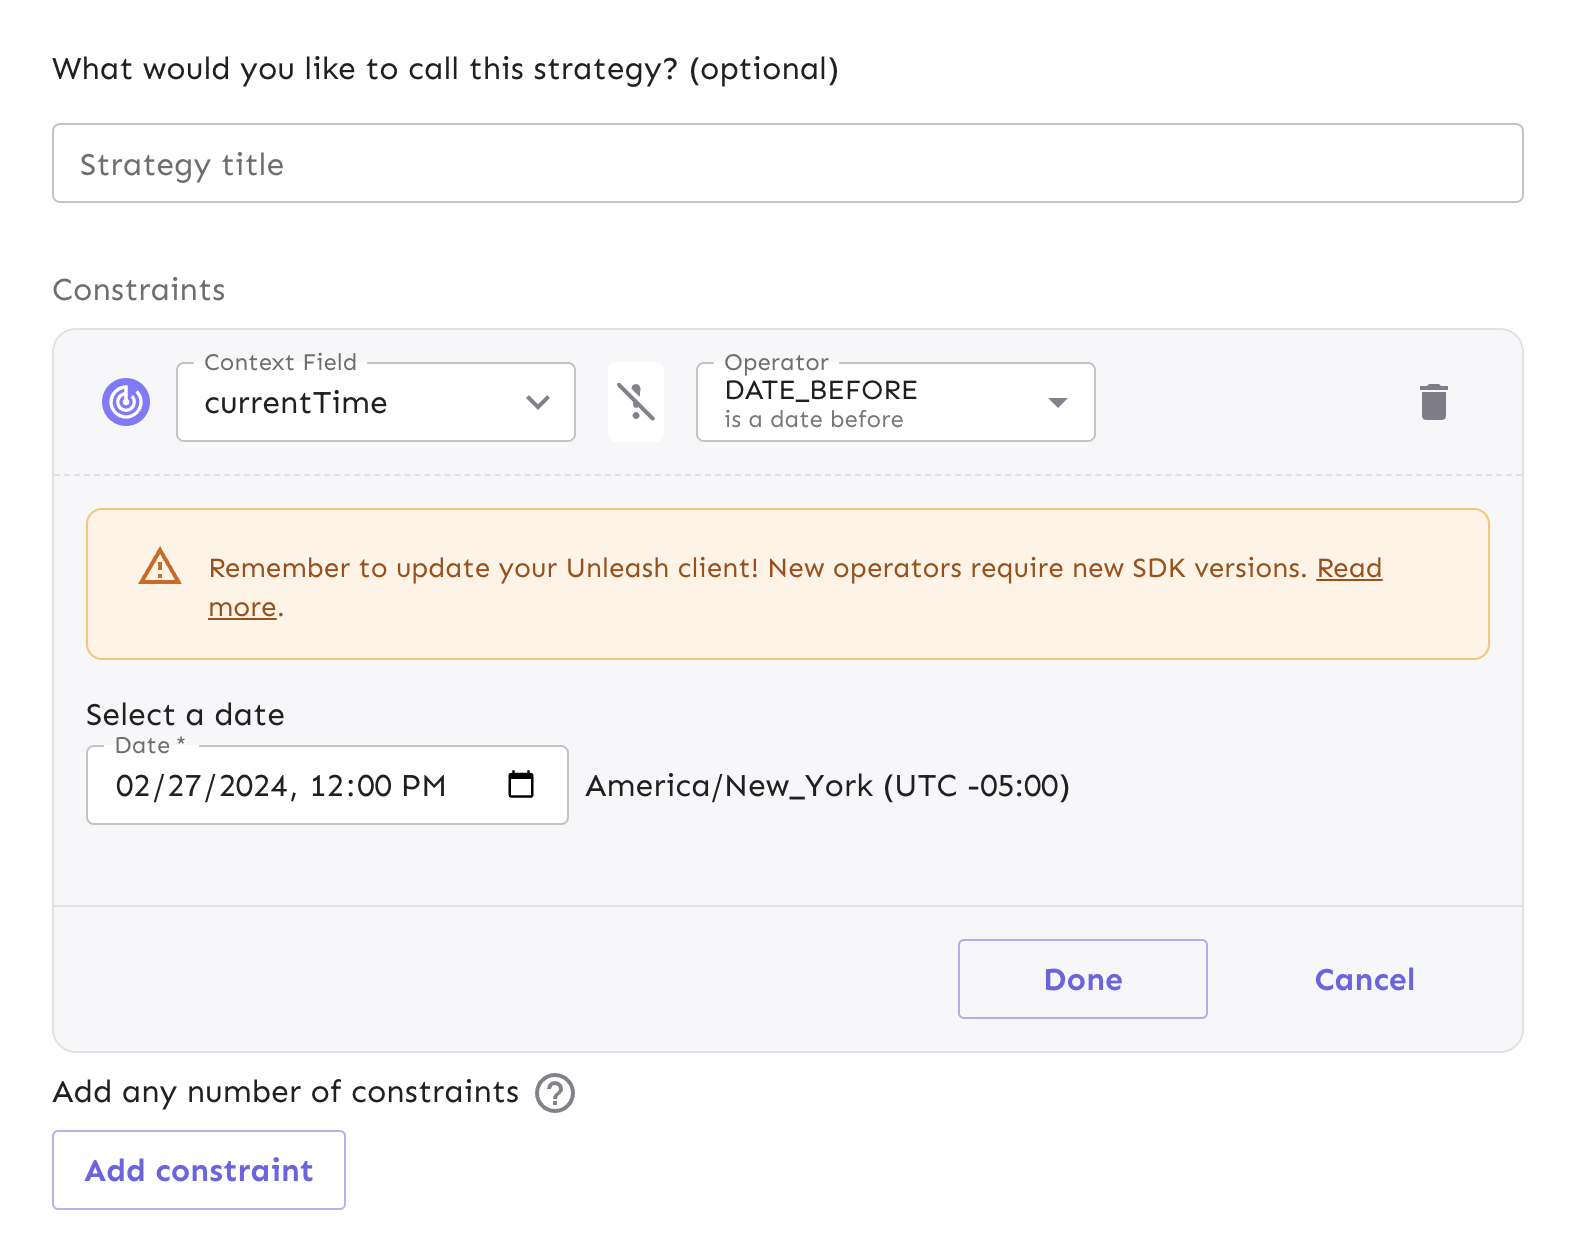
- The context field is set to currentTime
- The operator is set to DATE_BEFORE
- The date time is set to any time in the future
Once you’ve filled out the proper constraint fields, click ‘Done’ and save the strategy.
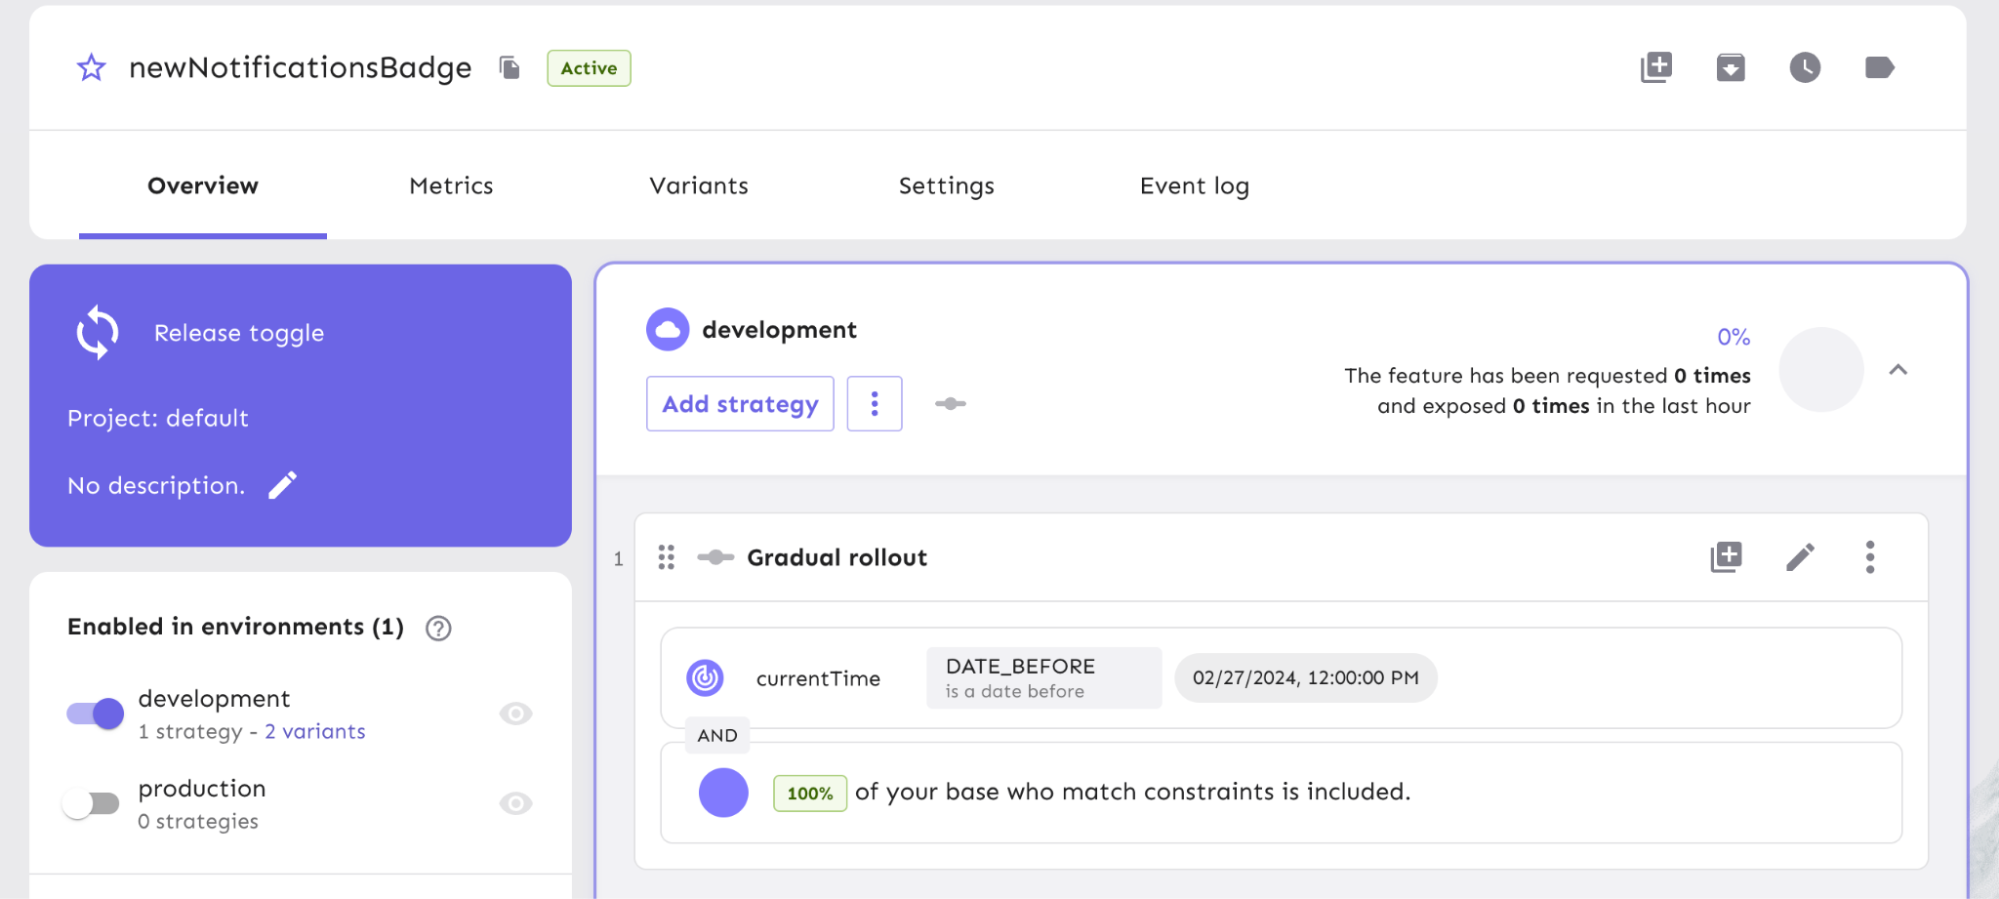
Your release process is now configured with a datetime-based strategy constraint.
Alternatively, you can send an API command to apply the same requirements:
Read our documentation for more context on the robustness of strategy constraint configurations and use cases.
A/B Testing in React
A/B testing is a common way for teams to test out how users interact with two or more versions of a new feature that is released. At Unleash, we call these variants.
We can expose a particular version of the feature to select user bases when a flag is enabled. From there, a way to use the variants is to view the performance metrics and see which is more efficient.
We can create several variations of this feature to release to users and gather performance metrics to determine which one yields better results. While teams may have different goals for measuring performance, Unleash enables you to configure strategy for the feature variants within your application/service and the platform.
In the context of our React tutorial, we have a notifications badge feature that displays in the top navigation menu. To implement feature flag variants for an A/B Test in React, we will set up a variant in the feature flag and use an announcement icon from Material UI to render a different version.
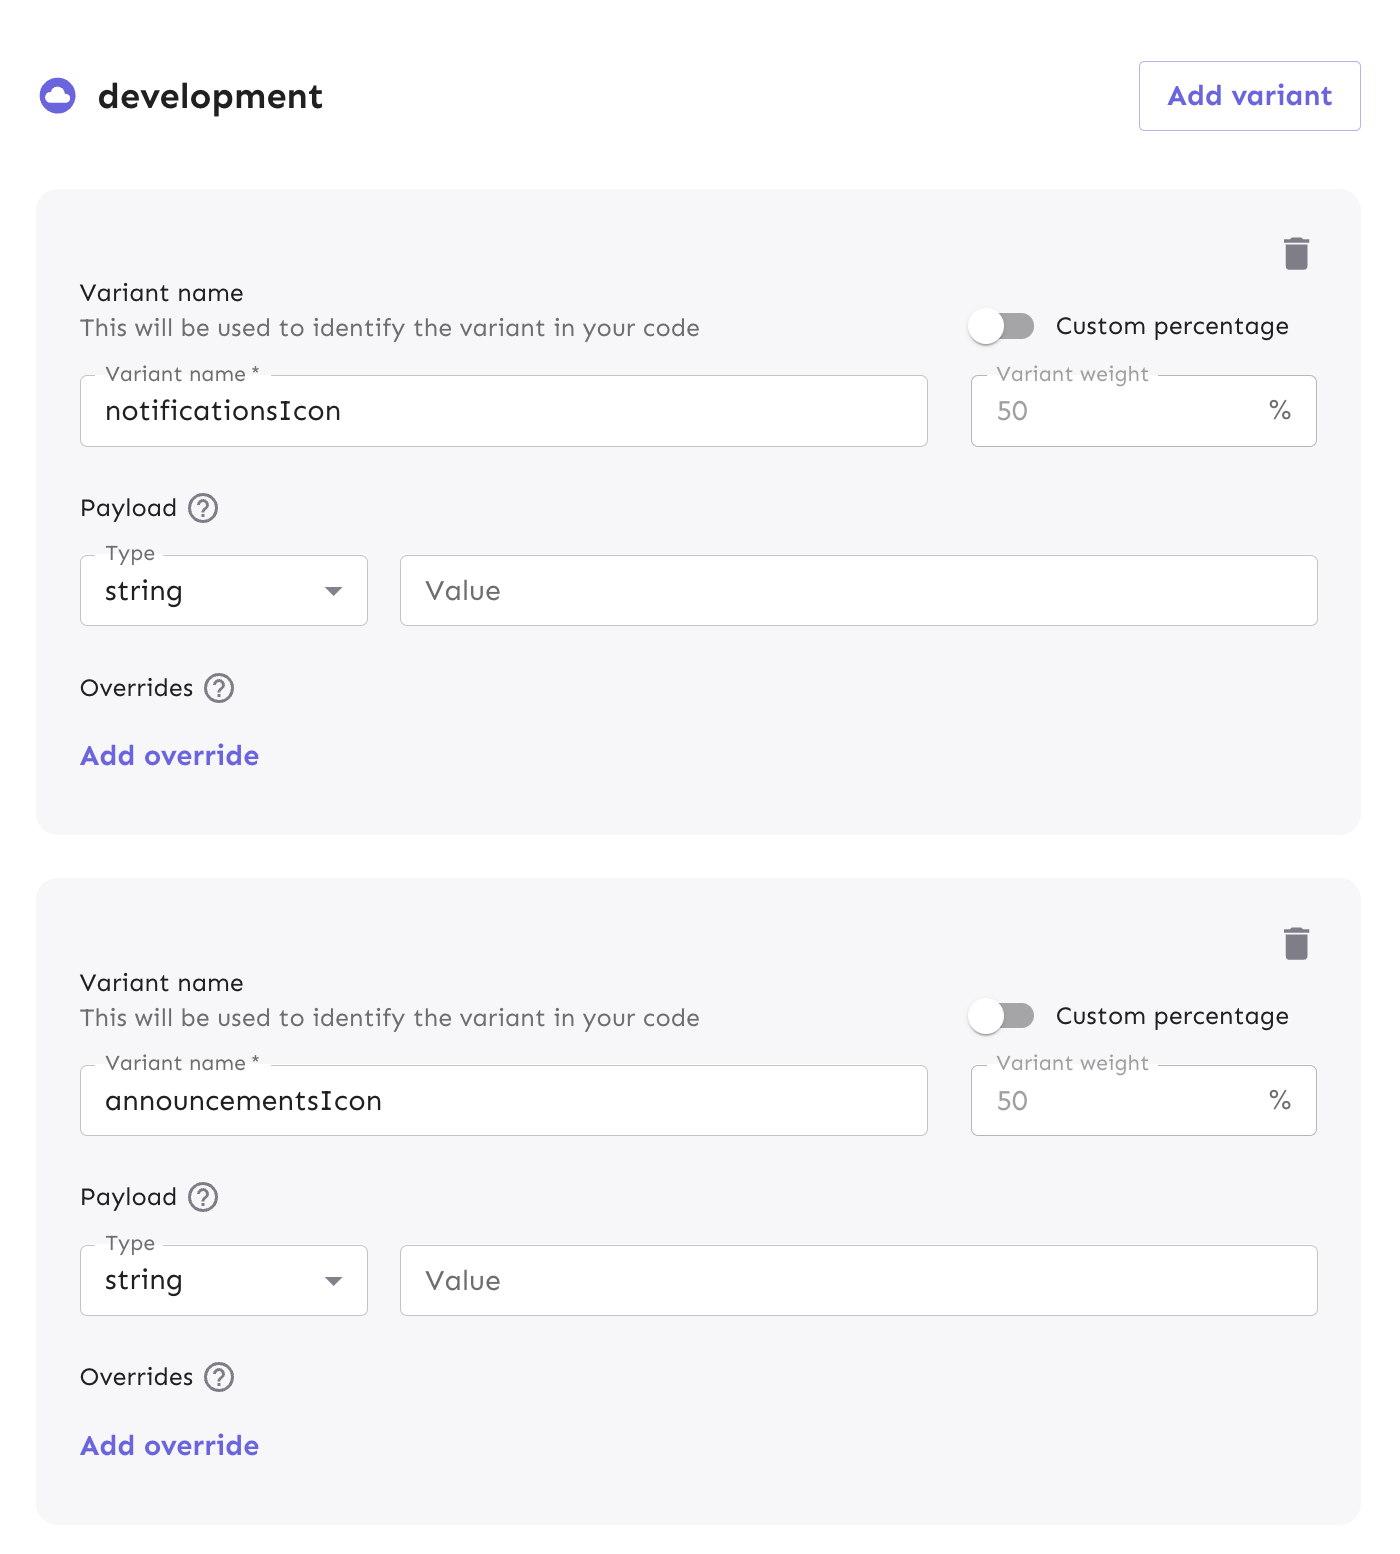
In Unleash, navigate to the feature flag’s Variants tab and add a variant.

In the Variants form, add two variants that will reference the different icons we will render in our app. Name them ‘notificationsIcon’ and ‘announcementsIcon’.
Note: We won’t use any particular payload from these variants other than their default returned objects. For this example, we can keep the variant at 50% weight for each variant, meaning there is a 50% chance that a user will see one icon versus the other. You can adjust the percentages based on your needs, such as making one icon a majority of users would see by increasing its weight percentage. Learn more about feature flag variant properties.
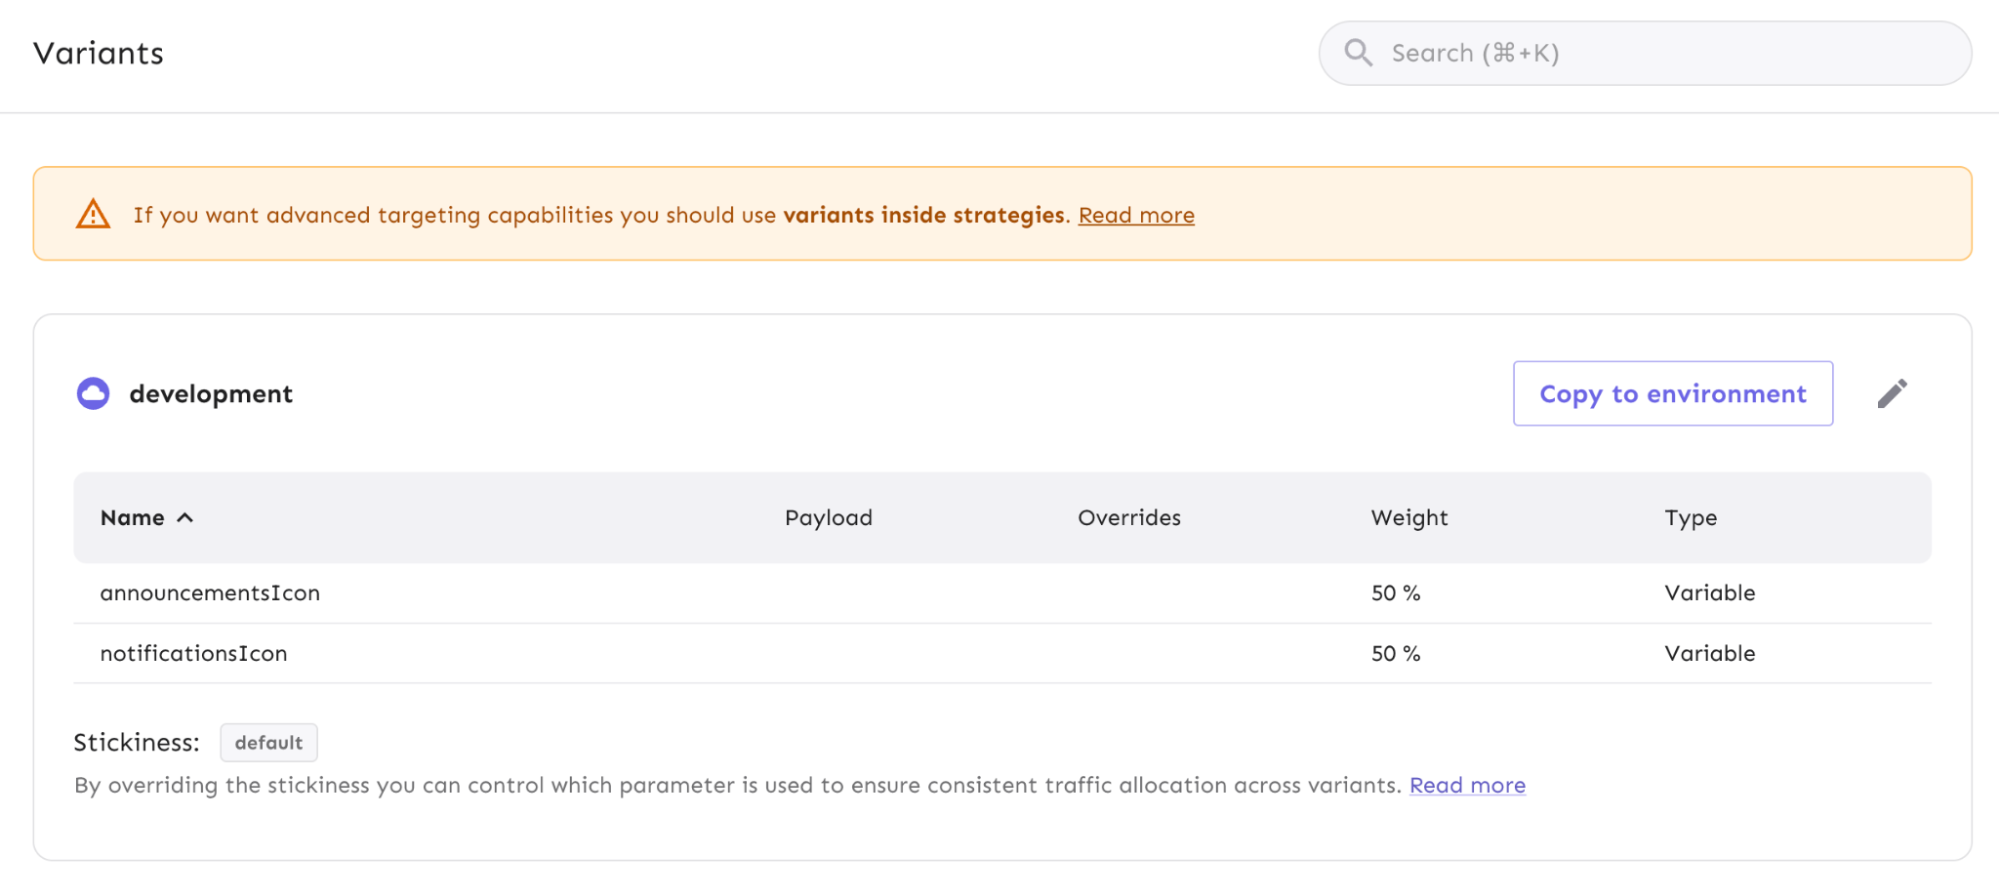
Once you click ‘Save variants’ at the bottom of the form, your view will display the list of variants in the development environment with their respective metadata.
Alternatively, we can create new variants via an API command below:
Now that we have configured our feature flag variants, we can reference them in the React code.
In NavBar.tsx, import the Announcements icon at the top of the file from Material UI, just like the Notifications icon.
The full import line now looks like this:
Unleash has a built-in React SDK hook called useVariant to retrieve variant data and perform different tasks against them.
Next, import the useVariant hook from the React SDK:
useVariant returns the name of the specific flag variant your user experiences, if it’s enabled, and if the overarching feature flag is enabled as well.
Within the NavBar component itself, we will:
- Reference the flag that holds the variants
- Reference the two variants to conditionally check that their enabled status for rendering
Next, we can modify what is returned in the NavBar component to account for the two variants the user might see on render.
Previously, we toggled the NotificationsIcon component based on whether or not the feature flag was enabled. We’ll take it one step further and conditionally display the icon components based on the feature flag’s variant status:
With our new variants implemented, 50% of users will see the announcements icon. The differences in the UI would look like this:
![]()
We have successfully configured our flag variants and implemented them into our React app for A/B testing in our development environment. Next, we can take a look at how Unleash can track the results of A/B testing and provide insights with data analytics.
Feature Flag Analytics and Reporting in React
Shipping code is one thing, but monitoring our applications is another thing we all have to account for. Some things to consider would be:
- Security concerns
- Performance metrics
- Tracking user behavior
Unleash was built with all of these considerations in mind as part of our feature flag management approach. You can use feature flag events to send impression data to an analytics tool you choose to integrate. For example, a new feature you’ve released could be causing more autoscaling in your service resources than expected and you either can view that in your Analytics tool or get notified from a Slack integration. Our impression data gives developers a full view of the activity that could raise any alarms.
We make it easy to get our data, your application, and an analytics tool connected so you can collect, analyze, and report relevant data for your teams.
Let’s walk through how to enable impression data for the feature flag we created from the React tutorial and capture the data in our app for analytics usage.
Enable feature flag impression data
At the flag level in Unleash, navigate to the Settings view.
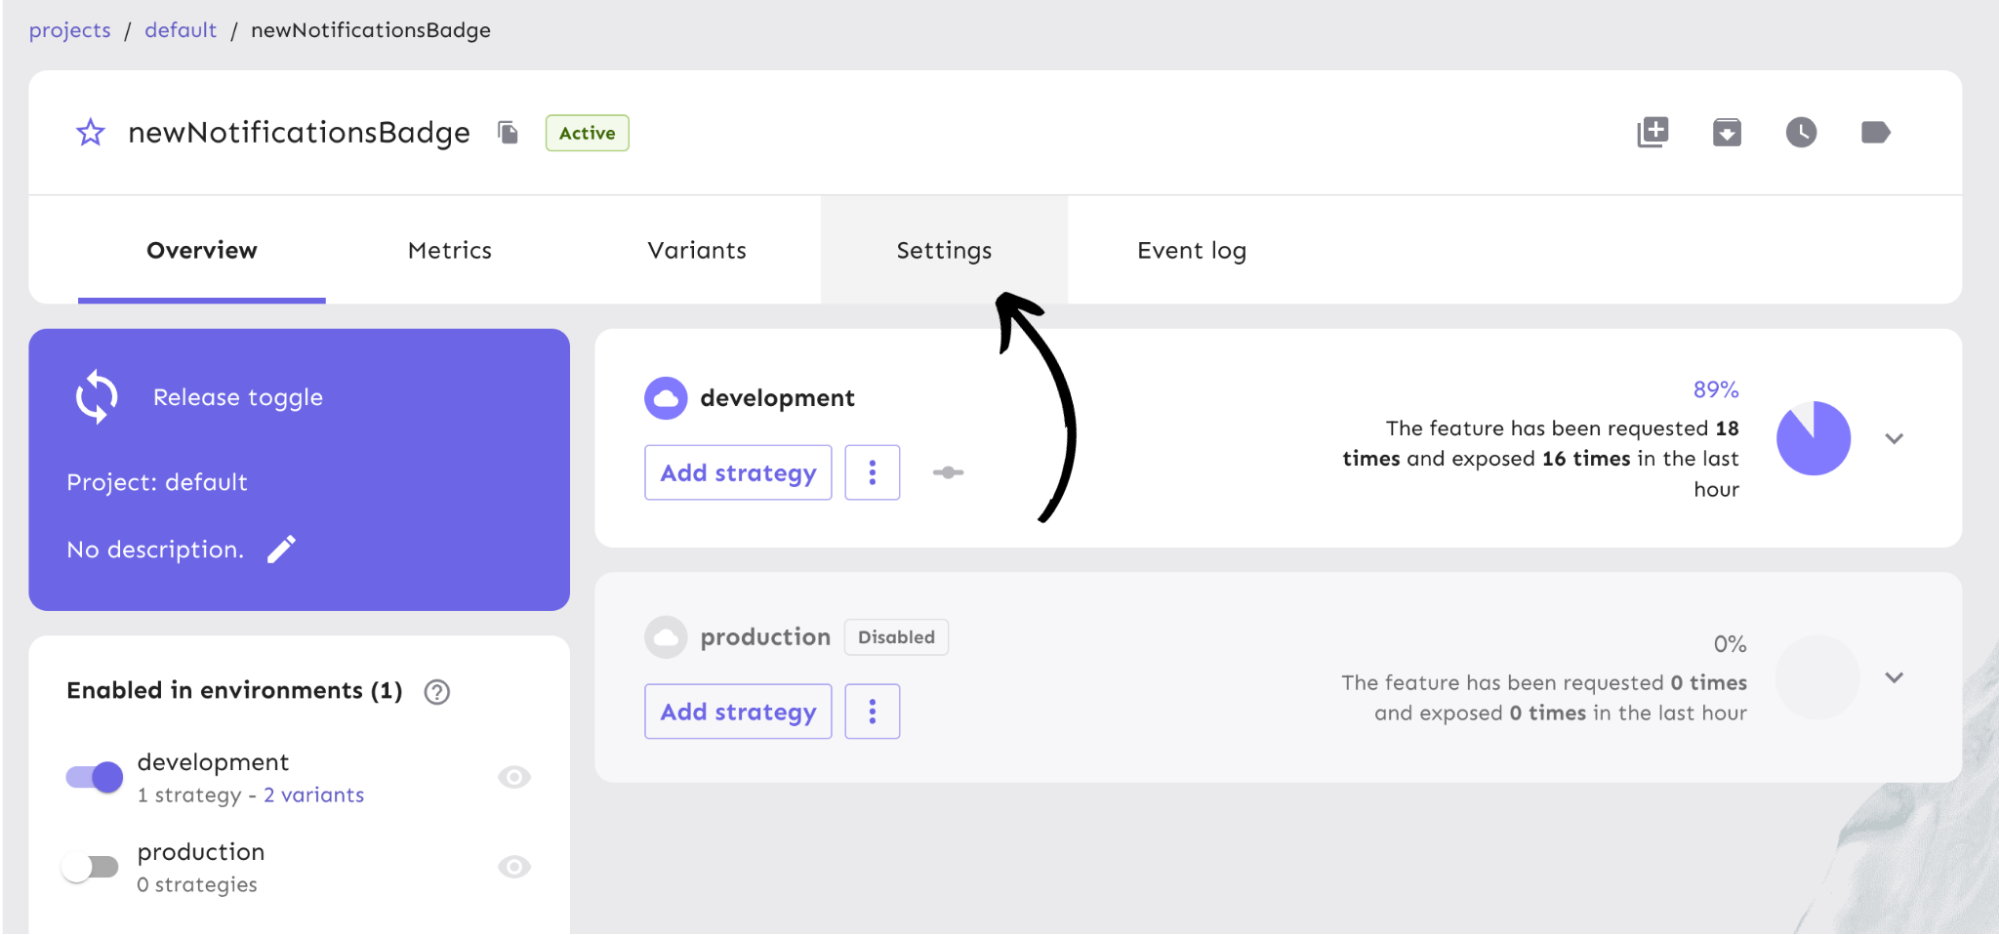
In the Settings view, click on the edit button. This will take us to the ‘Edit feature flag’ form.
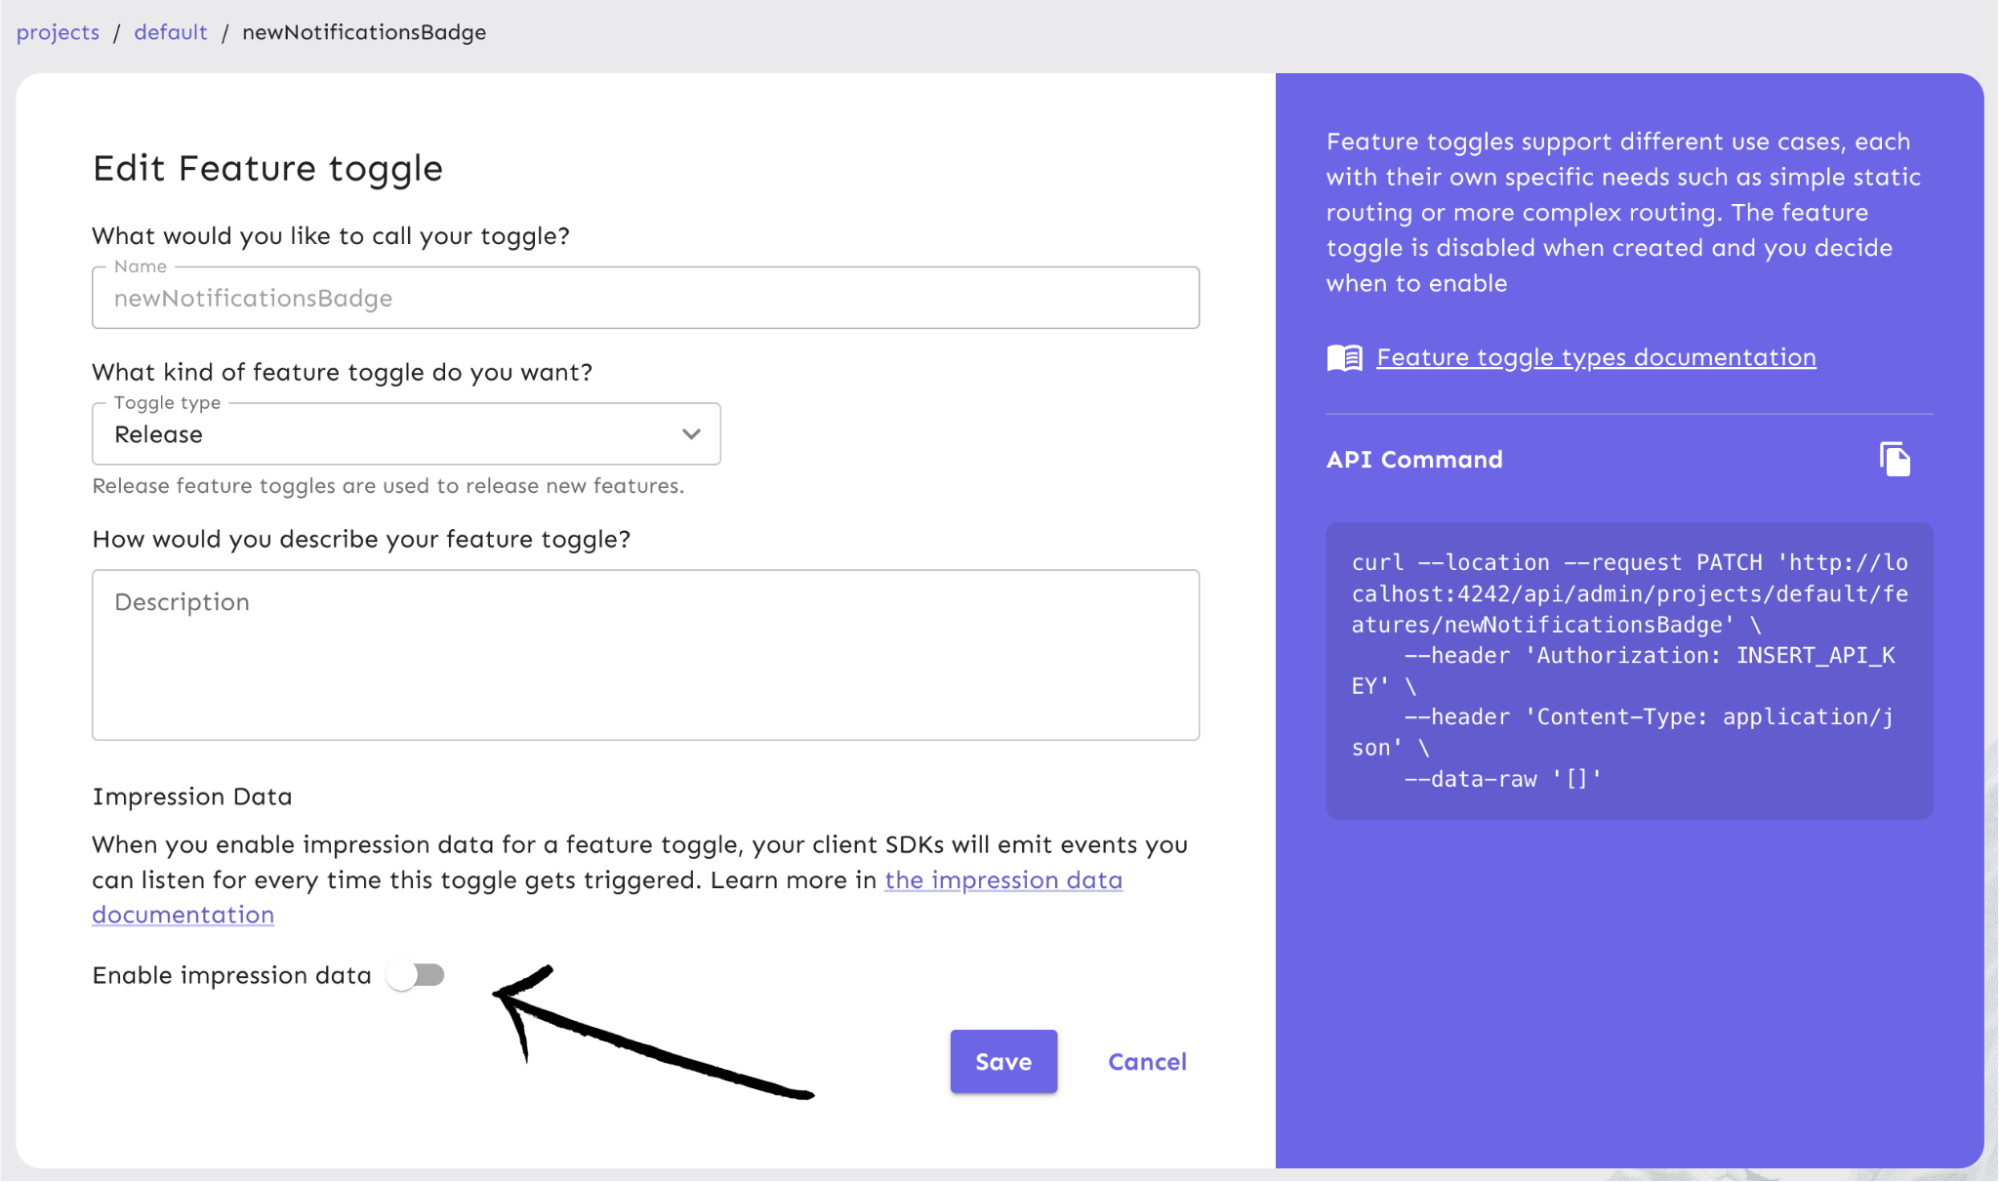
Turn on the impression data and hit ‘Save’. Events will now be emitted every time the feature flag is triggered.
You can also use our API command to enable the impression data:
Capture impression data for flag analytics
Next, let’s configure our React app to capture the impression events that are emitted when our flag is triggered. To do this, we can import the useUnleashClient hook from the React SDK into our app. This hook allows us to interact directly with the Unleash client to listen for events and log them.
In NavBar.tsx, pull in useUnleashClient. Our updated import line should look like this:
Next, within the NavBar component itself, call useUnleashClient and wrap a useEffect hook around our function calls to grab impression data with this code snippet:
This code snippet starts the Unleash client, checks that our flag is enabled, and then stores impression events for your use.
Note: We are passing in unleashClient into the dependency array in useEffect to prevent the app from unnecessarily mounting the component if the state of the data it holds has not changed.
Our flag impression data is now being logged!
In your browser, you can view the output for isEnabled:
And the console.log for getVariant returns:
You can find more information on isEnabled and getVariant in our impression data docs.
Now that the application is capturing impression events, you can configure the correct data fields and formatting to send to any analytics tool or data warehouse you use.
Application Metrics & Monitoring
Under the Metrics tab, you can see the general activity of the Cypress Real World App from our React tutorial in the development environment over different periods of time. If the app had a production environment enabled, we would also be able to view the amount of exposure and requests the app is receiving over time.
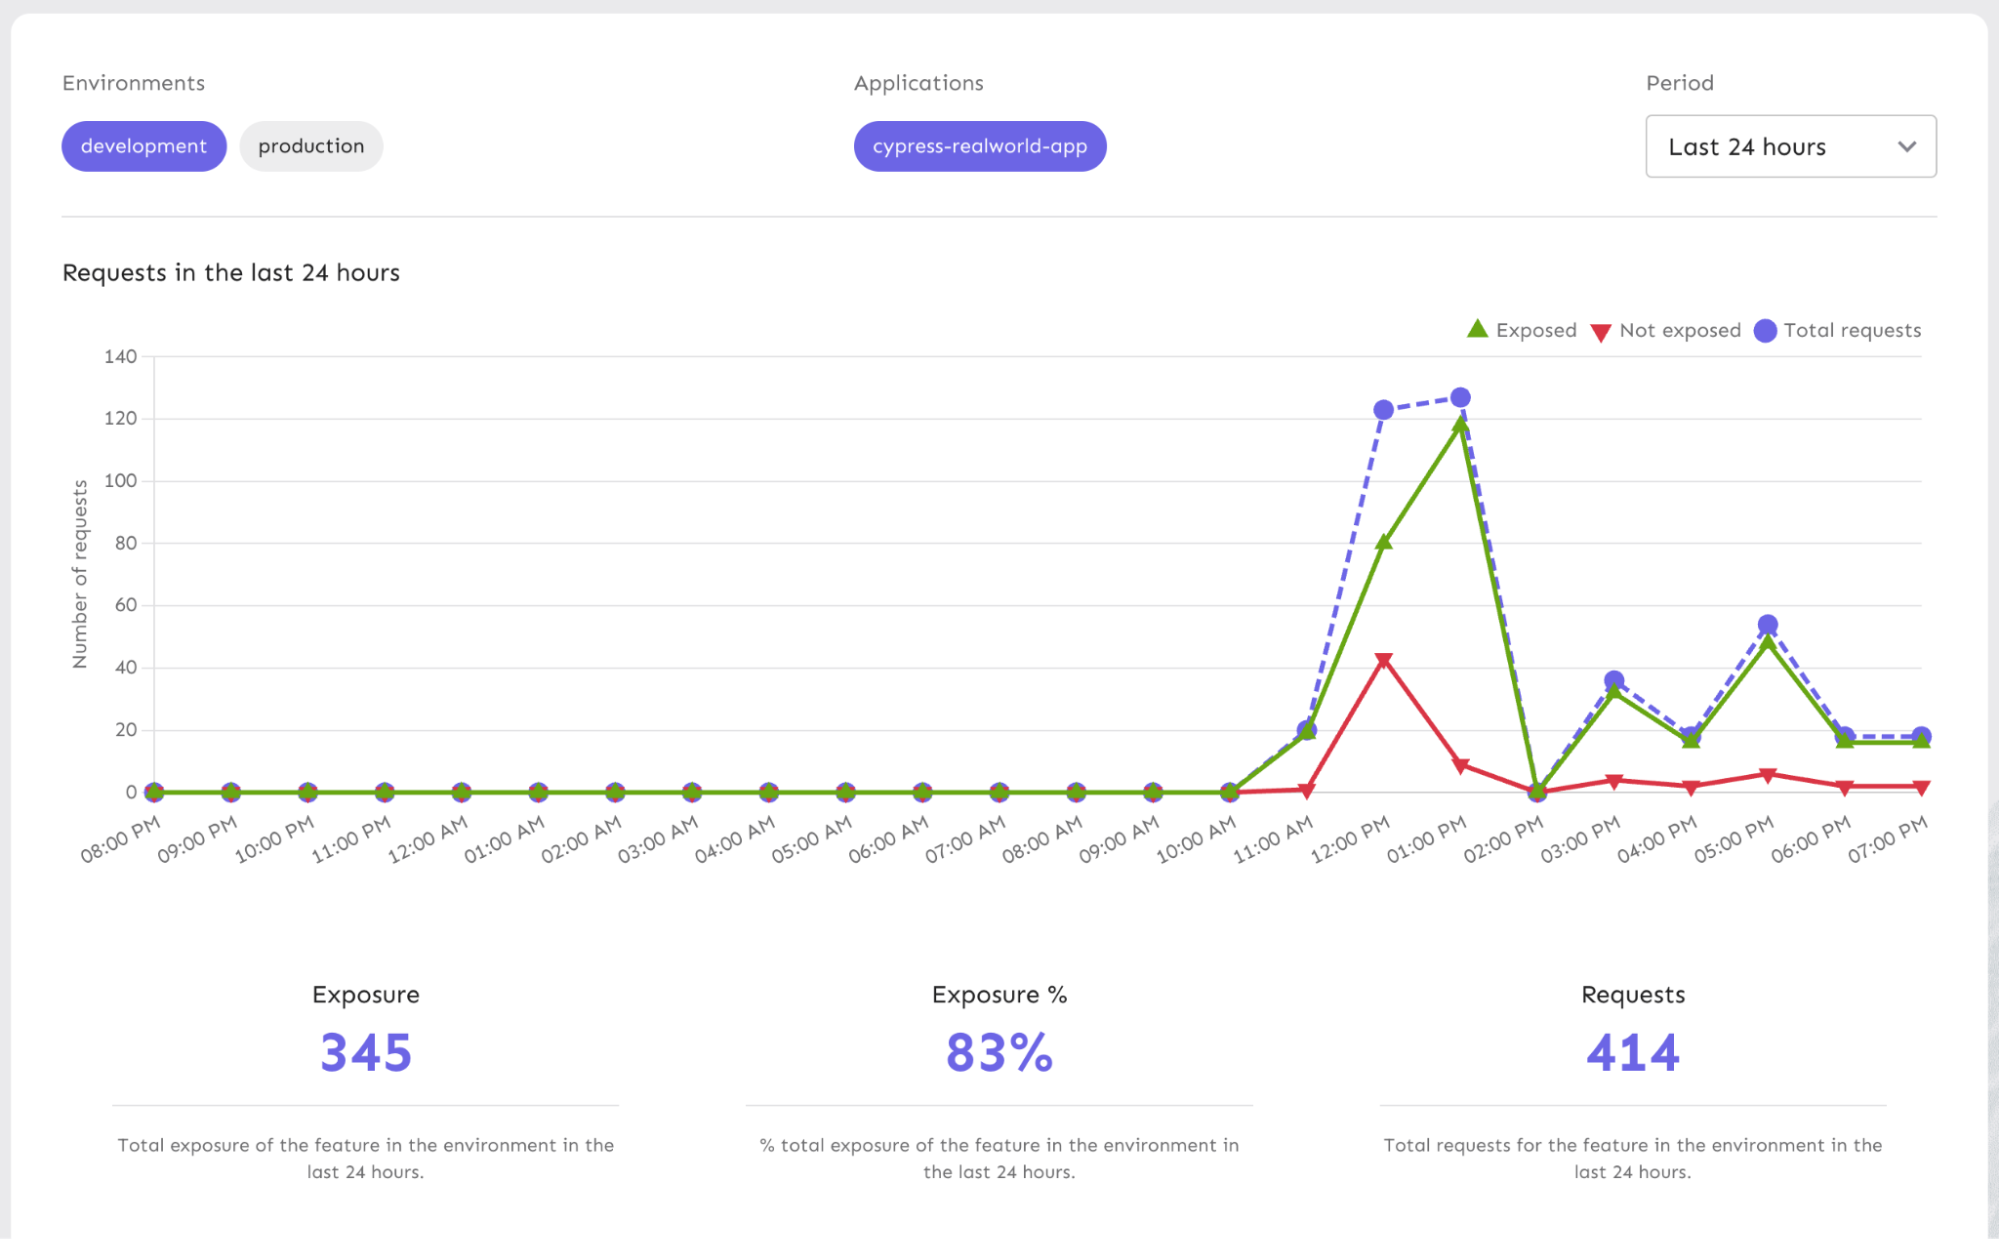
Our metrics are great for understanding user traffic. You can get a better sense of:
- What time(s) of the day or week are requests the highest?
- Which feature flags are the most popular?
Another use case for reviewing metrics is verifying that the right users are being exposed to your feature based on how you’ve configured your strategies and/or variants.
Take a look at our Metrics API documentation to understand how it works from a code perspective.
Feature Flag Audit Logs in React
Because a Feature Flag service controls the way an application behaves in production, it can be highly important to have visibility into when changes have been made and by whom. This is especially true in highly regulated environments, such as health care, insurance, banking, and others. In these cases (or similar), you might find audit logging useful for:
- Organizational compliance
- Change control
Fortunately, this is straightforward in Unleash Enterprise.
Unleash provides the data to log any change that has happened over time, at the flag level from a global level. In conjunction with Unleash, tools like Splunk can help you combine logs and run advanced queries against them. Logs are useful for downstream data warehouses or data lakes.
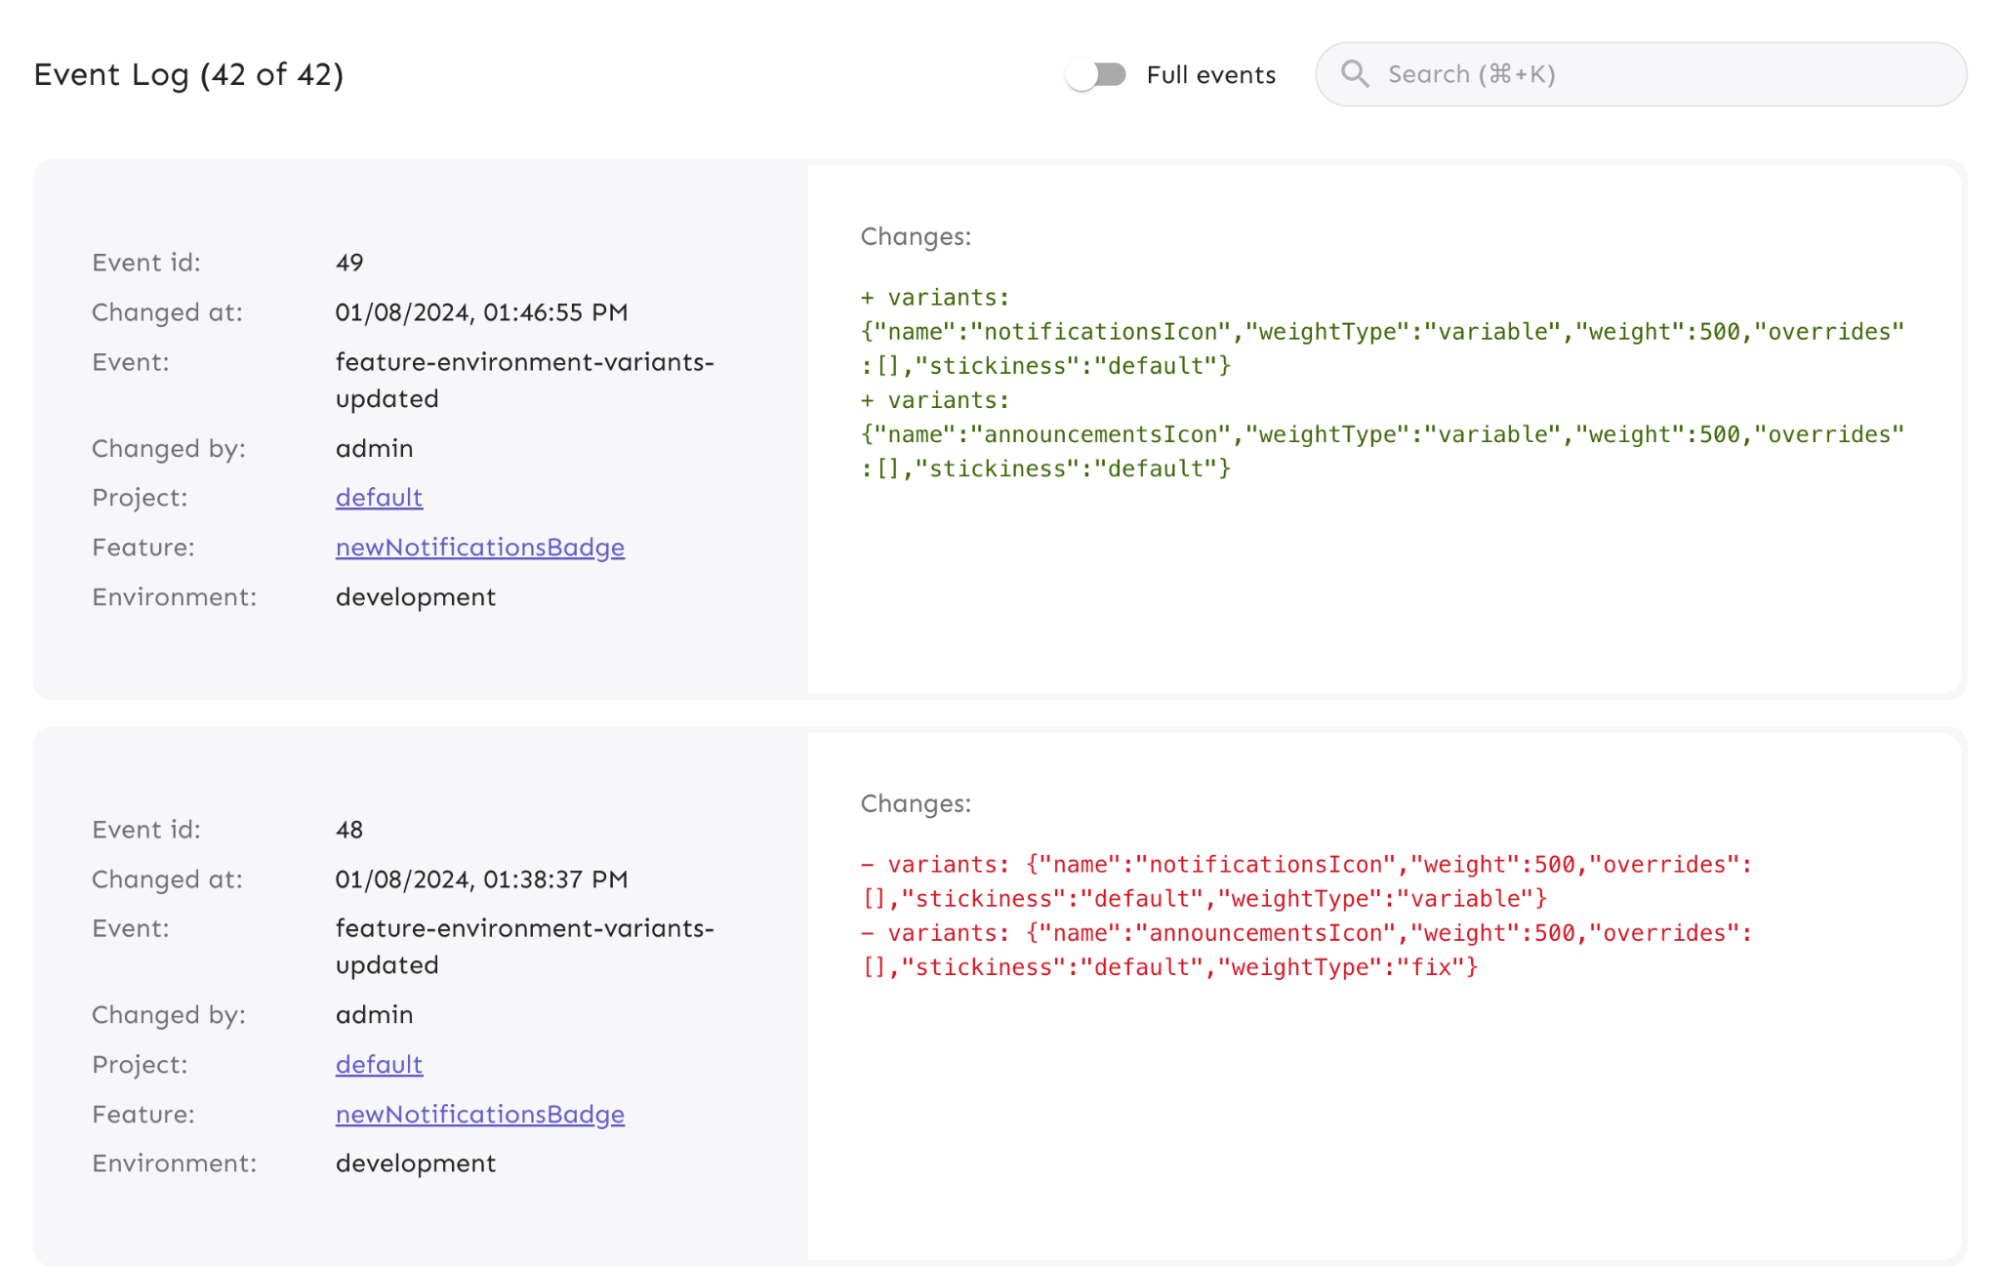
For our React tutorial application, we can view events in Event Log to monitor the changes to flag strategies and statuses we have made throughout our examples, such as:
- When the
newNotificationsBadgeflag was created - How the gradual rollout strategy was configured
- When and how the variants were created and configured
You can also retrieve events by using the API command below:
Read our documentation on Event Log and
Change Management & Feature Flag Approvals in React
Unleash makes it easy to toggle a feature. But the more users you have, the more risk with unexpected changes occurring. That’s why we implemented an approval workflow within Unleash Enterprise for making a change to a feature flag. This functions similar to GitHub’s pull requests, and models a Git review workflow. You could have one or more approvals required to reduce risk of someone changing something they shouldn’t. It helps development teams to have access only to what they need. For example, you can use Unleash to track changes to your React feature flag’s configuration.
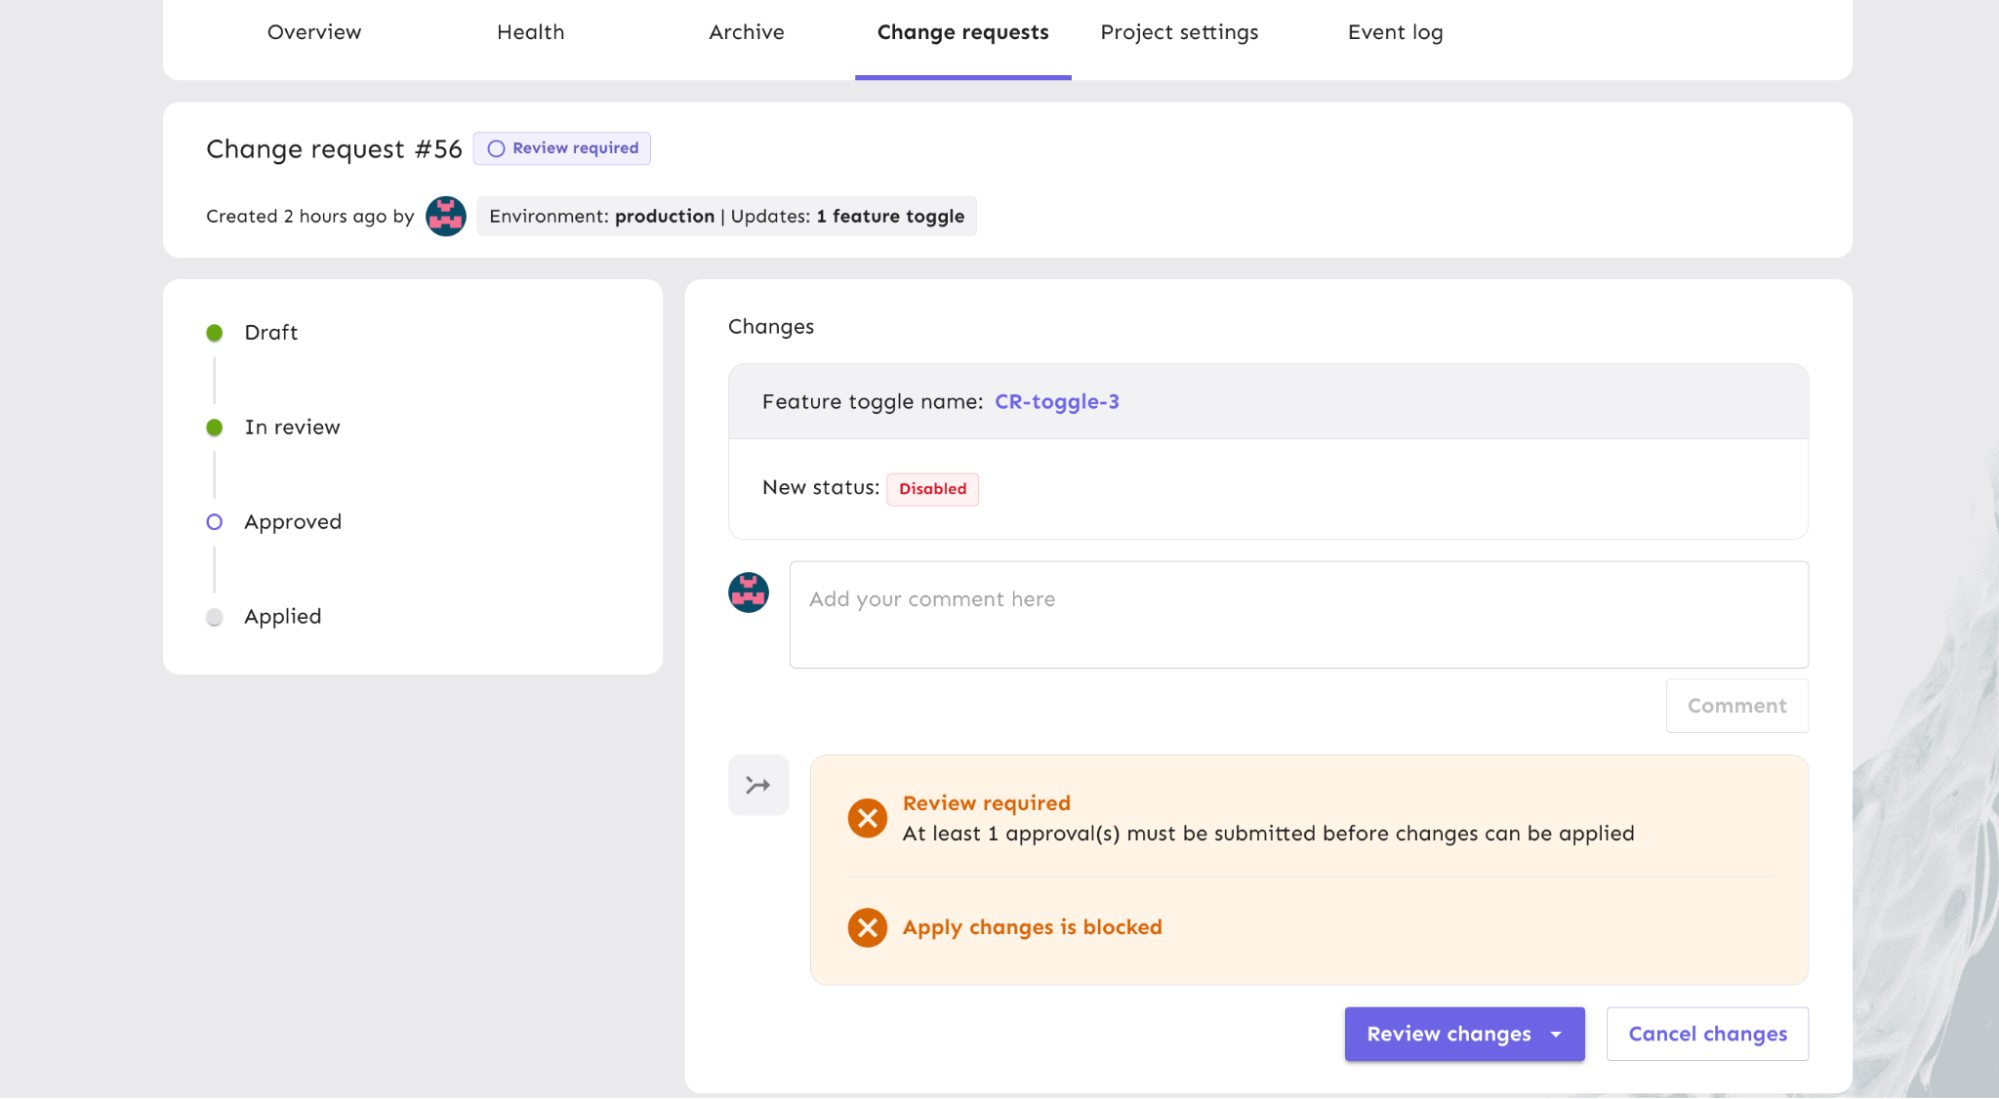
In Unleash Enterprise, we have a change request feature in your project settings to manage your feature flag approvals. When someone working in a project needs to update the status of a flag or strategy, they can follow our approval workflow to ensure that one or more team members review the change request.
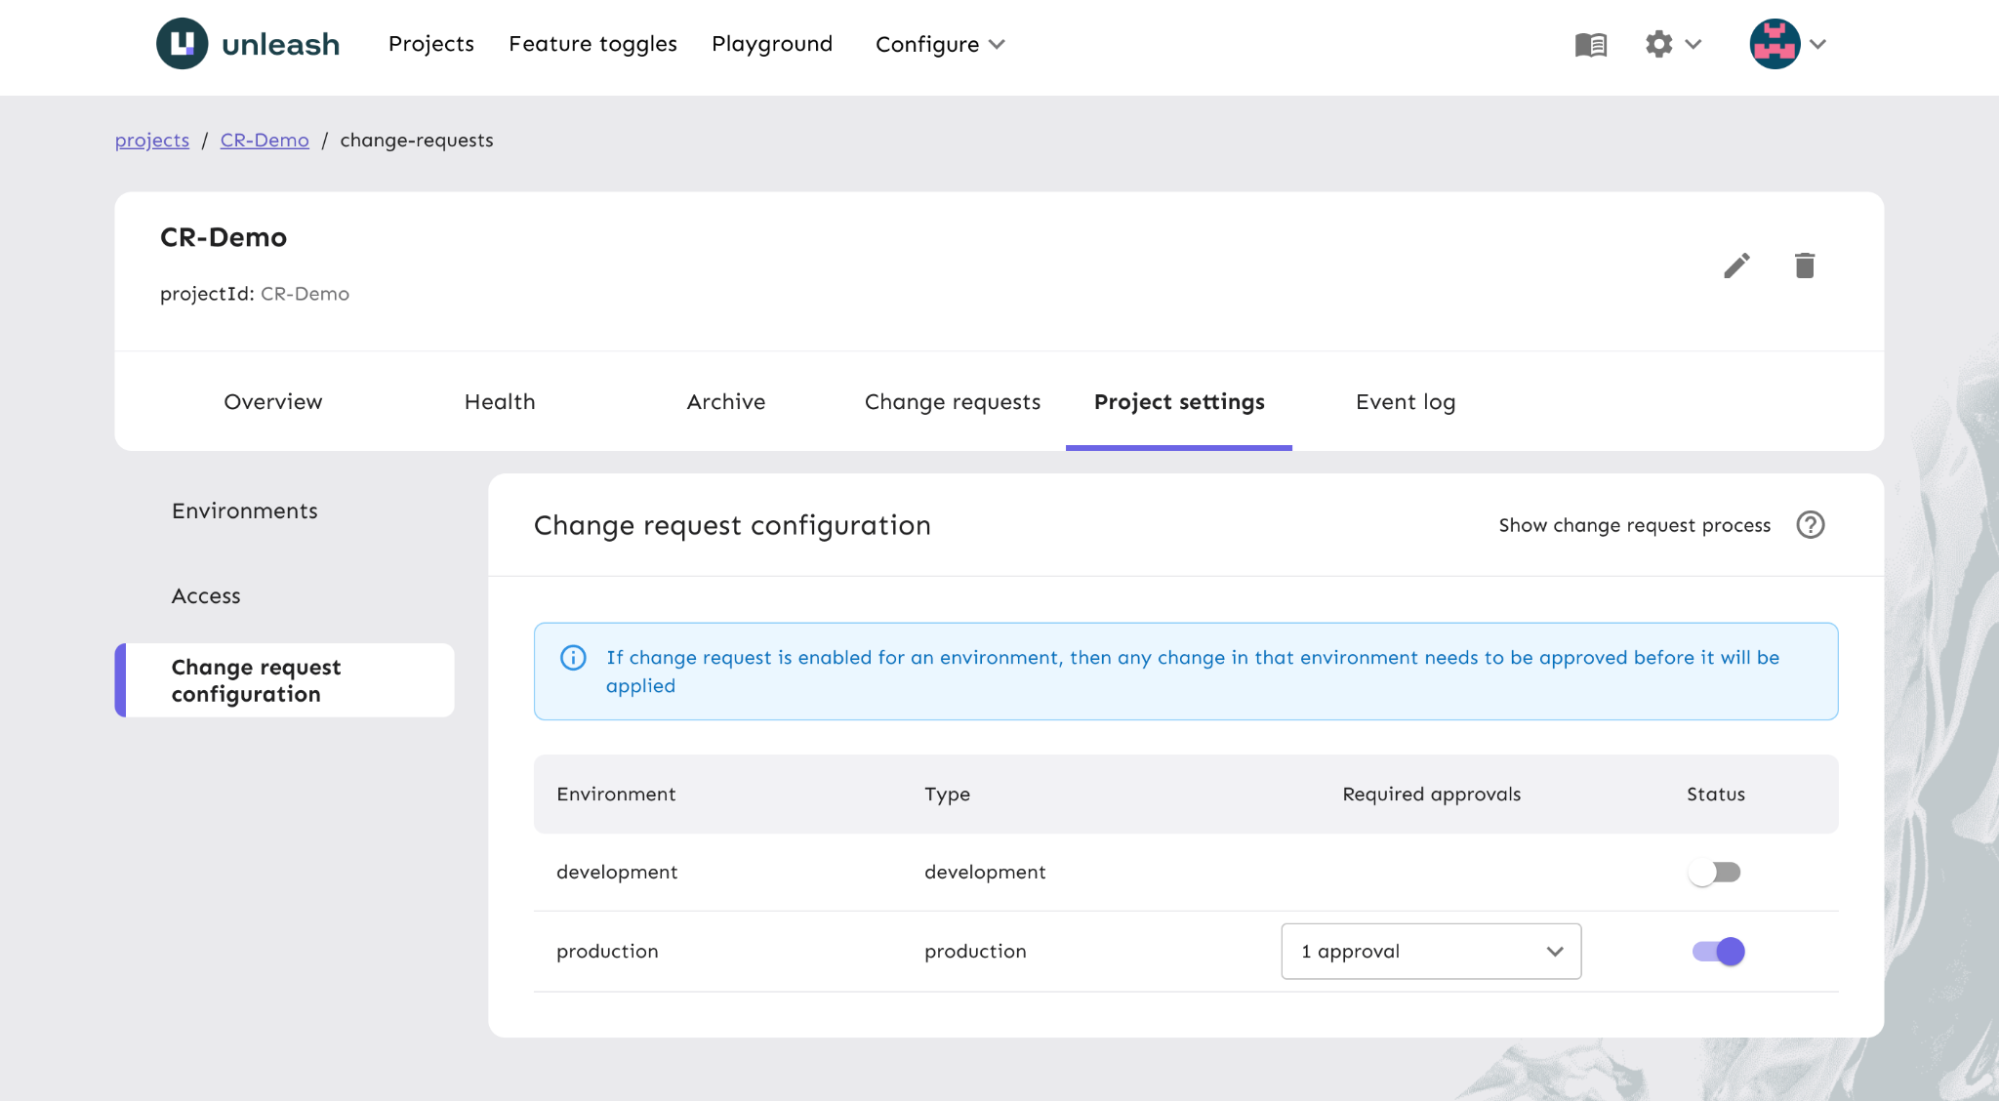
We have several statuses that indicate the stages a feature flag could be in as it progresses through the workflow. This facilitates collaboration on teams while reducing risk in environments like production. For larger scale change management, you can ensure the correct updates are made while having full visibility into who made the request for change and when.
Learn more about how to configure your change requests and our project collaboration mode.
Flag Automation & Workflow Integration for React Apps
An advanced use case for leveraging feature flags at scale is flag automation in your development workflow. Many organizations use tools like Jira for managing projects and tracking releases across teams. Our Unleash Jira plugin helps to manage feature flag lifecycles associated with your projects.
Let’s say the changes we’ve made in our React tutorial project need to go through a typical development workflow.
As your code progresses through development and Jira tickets are updated, the relevant flag can turn on in a development environment. The next stage could be canary deployments for testing code quality in subsequent environments to certain groups, like a QA team or beta users. The flag could be automatically turned on in QA and rollout and/or rollout to target audiences in production.
You can write your own integration to your own ticketing tool if you don’t use Jira. And join our Slack to discuss this if you’re not sure how to proceed.
Here’s how this can be done via our API:
-
Enable a flag.
Review our API docs on flag enablement.
-
Update a flag.
And the required body field object would look like this:
Review our API docs on updating feature flags.
-
Archive a flag.
Review API docs on archiving flags.
Common Usage Examples of React Feature Flags
To take full advantage of our React SDK, we’ve compiled a list of the most common functions to call in a React app.
useFlag example
useVariant example
useUnleashClient example
useUnleashContext example
Read more on Unleash Context and the fields you can request and update.
useFlags example
useFlagsStatus example
Additional Examples
Many additional use cases exist for React, including deferring client start, usage with class components, React Native, and more, all of which can be found in our React SDK documentation.